Why Knowing How to Fix a Flat Roof Can Save You Thousands
Fixing a flat roof the right way starts with a few clear steps — here’s the quick version if you’re in a hurry:
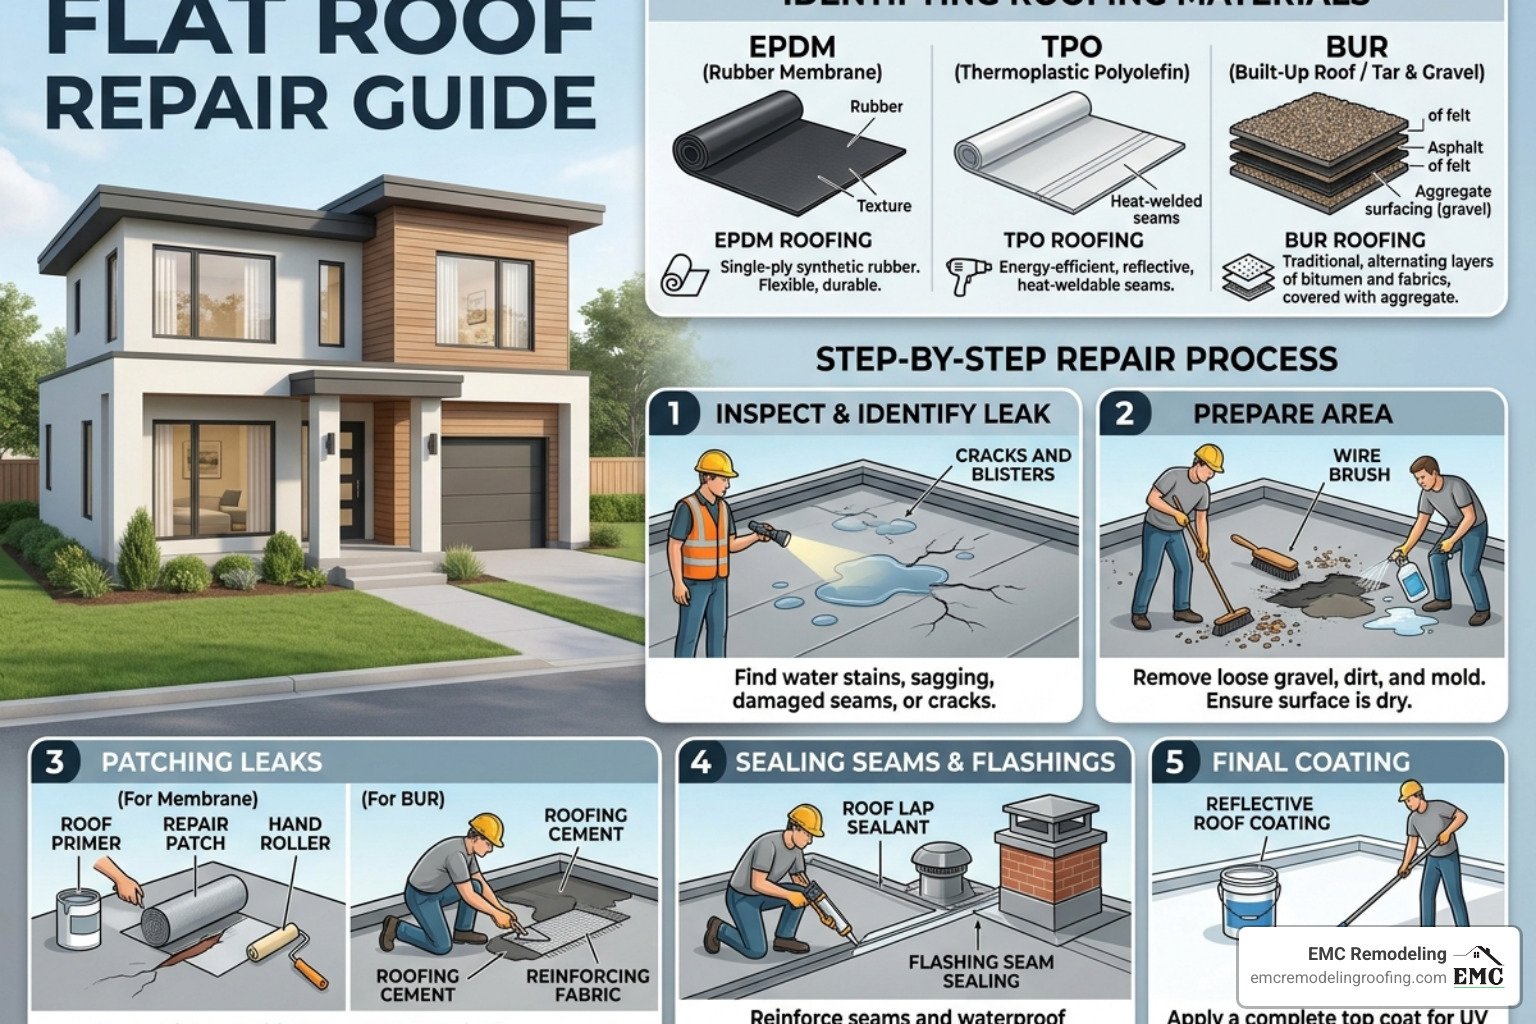
- Identify your roof material (EPDM, TPO, BUR, or Modified Bitumen)
- Locate the leak source — measure from interior water stains and search upslope on the roof
- Clean and dry the repair area completely before applying anything
- Apply matching patch material — cement, self-adhesive patch, or heat-welded membrane
- Test the repair with a hose after 24 hours of curing
- Inspect flashing around vents, HVAC units, and edges — over 90% of flat roof leaks start here
That persistent drip in your ceiling after a rainstorm isn’t just annoying — it’s a warning. Flat roofs are a feature on millions of homes and commercial buildings across Central Texas, and they work well when maintained. But unlike pitched roofs, they drain slowly and rely entirely on a continuous membrane to stay watertight. When that membrane fails, water doesn’t just fall straight through. It travels sideways — sometimes 10 feet or more — before showing up as a stain on your ceiling.
The flat roofing market was valued at over $59 billion in 2024, which tells you just how widespread these systems are. Yet most flat roof problems — blistering, cracking seams, failed flashing — are caught too late, turning a $300 patch job into a $5,000 structural repair.
The good news? Most damage is fixable without a full replacement. And knowing the difference between a DIY-friendly puncture and a problem that needs a professional is exactly what this guide covers. For expert roofing services in Temple, TX, help is closer than you think.
I’m Matthew Runyon, President of EMC Remodeling & Roofing, and with over 15 years of hands-on experience helping Central Texas homeowners fix a flat roof — from minor membrane patches to full restorations after storm damage — I’ve seen what works and what makes things worse. Let’s walk through the right way to do it.

Identifying Your System to Fix a Flat Roof
Before you grab a bucket of tar and a trowel, stop! Flat roof identification is the absolute first step in any successful repair. Using the wrong material is the single biggest mistake we see in Central Texas. For example, applying petroleum-based asphalt cement to an EPDM rubber roof will cause the membrane to swell and dissolve. It’s a chemical reaction that turns a small leak into a giant hole.
To fix a flat roof effectively, you must match the repair material to the existing chemistry. Here is how to tell what you have:
- EPDM (Ethylene Propylene Diene Monomer): This is essentially a giant rubber inner tube. It is almost always black (though some white versions exist), feels like rubber, and comes in large sheets.
- TPO (Thermoplastic Polyolefin) and PVC: These are “single-ply” membranes that are typically white, light gray, or tan. They feel like a heavy-duty pool liner. You can identify them by their heat-welded seams where the sheets overlap.
- Built-Up Roofing (BUR): Often called “tar and gravel” roofs. These are old-school and tough. They consist of multiple layers of bitumen and felt, topped with a layer of gravel or river stones to protect against UV rays.
- Modified Bitumen: This looks like a hybrid between BUR and asphalt shingles. It often has a granulated surface (like a shingle) and is rolled out in sheets. If you see hail damage on your flat roof, it often shows up on these systems as circular “bruises” where the granules have been knocked away.

Material Compatibility and Lifespan
Understanding the lifespan of your material helps you decide if a repair is worth it. A quality BUR system can last 20 to 30 years, while TPO systems typically range from 15 to 25 years.
| Material Type | Identification | Repair Difficulty | Expected Lifespan |
|---|---|---|---|
| EPDM | Black, rubbery, large sheets | Moderate (Adhesive-based) | 20–25 Years |
| TPO/PVC | White/Gray, plastic feel | High (Requires heat welding) | 15–25 Years |
| BUR | Gravel or stone surface | High (Heavy/Dirty) | 20–30 Years |
| Mod-Bit | Granulated, asphalt-like | Moderate (Torch or Cold-applied) | 15–20 Years |
Locating the Exact Source of a Flat Roof Leak
Finding a leak on a flat roof is a bit like being a detective. Water is sneaky; it follows the path of least resistance. Because flat roofs usually have a very slight slope (at least 1/4 inch per foot), water often enters at one point, travels laterally along a roof joist, and drips into your living room 10 feet away.
To locate the source, follow this “Inside-Out” method:
- Measure the Interior: Find the drip point inside. Measure its distance from the two closest exterior walls.
- Transfer to the Roof: Take those same measurements up to the roof. Mark that spot with chalk.
- Search Upslope: From your mark, look “upslope” (towards the higher side of the roof). Check for punctures, open seams, or “blisters” (bubbles in the membrane).
- Check the 90% Rule: Statistics show that over 90% of flat roof leaks occur at the flashing. These are the metal transitions around chimneys, vents, HVAC units, and the roof edges. If you don’t see a hole in the main field, check the metal edges first.
For persistent “ghost leaks,” we sometimes use thermography. This involves using an infrared camera after sunset. Because wet insulation holds heat longer than dry insulation, the leak source will literally glow on our screen. If you’re struggling to find the entry point, you can follow this simple 7-step fix guide to narrow it down.
Step-by-Step Guide to Fix a Flat Roof Leak
If you’ve identified the hole and the material, it’s time to get to work. Remember our golden rule: Successful flat roof repair is 90% preparation and 10% application. If you apply a patch to a dirty or damp roof, it will fail within months.
1. Preparation and Cleaning
You must scrub the area around the damage. Use a stiff brush and a cleaner compatible with your roof type (soap and water for EPDM; specific solvents for TPO). The area must be bone-dry. In Leander, TX, the humidity can stay high, so use a leaf blower or wait for the afternoon sun to ensure no moisture is trapped under your patch.
2. Priming (The Secret Sauce)
Most modern membranes require a primer. This isn’t paint; it’s a chemical “etchant” that cleans the surface at a molecular level so the adhesive can bond. Apply the primer and wait for it to become “tacky” — usually about 5 to 10 minutes depending on the temperature.
3. Patching Cracks, Blisters, and Seams to Fix a Flat Roof
The method depends on the material, but the goal is the same: a watertight seal that extends at least 6 inches beyond the damage in all directions.
- For BUR or Modified Bitumen: Apply a layer of roofing cement (1/8 inch thick), embed a piece of fiberglass mesh (scrim), and then apply another layer of cement over the top. Always “feather” the edges — meaning you smooth the cement out thin at the edges so water doesn’t “dam” up against it. If you’re working on an older asphalt system, check out our Asphalt Flat Roof Repair Ultimate Guide for specific mixing ratios.
- For EPDM: Use a self-adhesive EPDM patch. Round the corners of the patch with scissors before applying; square corners tend to peel up over time. Use a heavy roller to press the patch from the center outward to remove air bubbles.
- For TPO: This usually requires a professional with a hot-air welder. However, for an emergency fix, specialized TPO-compatible sealants can buy you time until we can perform a permanent heat-welded repair.
If your roof was damaged by a recent Central Texas storm, you might need hail damage repair rather than just a simple patch.

4. Final Inspection and Testing to Fix a Flat Roof
Once the repair has cured (usually 24 hours), it’s time for the “Hose Test.” Have someone stand inside the building while you run a garden hose over the repair area for 10 to 15 minutes. If it stays dry inside, you’ve succeeded!
To extend the life of your patch, we recommend applying a reflective coating. These white coatings protect the repair from UV rays and can lower your roof surface temperature by up to 50 degrees during a hot Texas July. This is a standard part of our roof repair services.
Restoration vs. Replacement: When to Call the Pros
One of the most surprising statistics in the roofing industry is that 85% of roofs replaced don’t actually need to be torn off. They can be restored. At EMC Remodeling, we often use advanced silicone membrane systems like IntegriGard®.
The Case for Restoration
If your roof is aging but the structure is sound, a silicone coating can add 10 to 15 years of life for about half the cost of a replacement. Restoration is a great option if:
- The damage covers less than 25% of the roof.
- The underlying insulation is dry (verified by a moisture scan).
- The roof isn’t “ponding” water for more than 48 hours.
When Replacement is Mandatory
You cannot patch your way out of structural failure. If the roof deck feels “spongy” under your feet, it means the wood underneath is rotting. At that point, a patch is just a Band-Aid on a broken leg. Similarly, if you have multiple leaks across the entire surface, the membrane has reached the end of its chemical life.
For homeowners in Leander or Temple, we offer 24/7 emergency roof repair to help you stabilize a failing roof before it ruins your interior. If the damage is extensive, we can assist with the insurance claims process to ensure you get the coverage you’re entitled to.
Frequently Asked Questions about Flat Roof Repair
How long does a DIY flat roof patch last?
If applied correctly on a clean, dry surface with matching materials, a DIY patch can last 5 to 10 years. However, most DIY patches fail because the surface wasn’t cleaned properly or the wrong cement was used.
What is the most common cause of flat roof leaks?
Failed flashing. Over 90% of leaks start where the roof meets a wall, a pipe, or a vent. The metal expands and contracts at a different rate than the roof membrane, which eventually pulls the sealant apart.
Can I use standard asphalt shingles on a flat roof?
Absolutely not. Building codes (and common sense) prohibit shingles on any roof with a pitch lower than 2:12. On a flat roof, water will sit on the shingle, seep under the tabs, and rot your roof deck in a matter of weeks.
How much does flat roof repair cost?
Professional repairs typically range from $5 to $10 per square foot, plus a service fee. While DIY is cheaper ($50–$100 in materials), a professional repair often lasts 3 to 5 times longer.
Conclusion
Maintaining a flat roof in 2026 requires a proactive approach to drainage and seam integrity. In the heat of Central Texas, the sun is your roof’s greatest enemy, followed closely by ponding water. By identifying your material, finding the true source of the leak, and using the right patching techniques, you can add years to your roof’s life.
Whether you need a quick patch or a full silicone restoration, EMC Remodeling is here to help. We are a family-operated business in Temple, TX, and we pride ourselves on exceptional craftsmanship and direct owner involvement. We don’t just fix roofs; we build relationships with our neighbors in Leander, TX and the surrounding areas.
Stop the drip before it turns into a flip. If you’re feeling overwhelmed or the leak just won’t stop, visit our Flat Roof Repair CTA page to schedule a free inspection. We offer 24/7 support because we know that leaks don’t wait for business hours.
