Emergency Roof-First Checklist After Wind Damage (Why Siding Repairs Fail Without It)
Repairing vinyl siding wind damage must start with the roofline—because wind-driven rain almost always enters at the top of the wall system first (roof edges, flashing, soffit, and gutters) and then shows up as “siding problems.” For homeowners seeking Central Texas roofing and exterior restoration experts, the priority is sealing the building envelope from the top down. According to the Insurance Information Institute, wind and hail damage accounted for 45.5% of all homeowners insurance losses in 2021, with roof-related failures being the primary driver of interior water claims. After a Central Texas storm, the fastest way to prevent interior water damage is to secure the roof and roof-wall transitions the same day. Homeowners who want one coordinated exterior response typically begin with EMC’s emergency exterior and roofing help in Central Texas.
Answer first: What to do immediately after wind damage (roof-first order)
- Stop active leaks now (tarp or temporary seal) and book 24/7 emergency roof repair.
- Check roof edges and flashing (rakes, eaves, valleys, wall flashings). Loose flashing is a primary leak path.
- Verify gutters and downspouts are attached. Wind-twisted gutters can pour water behind siding.
- Then repair vinyl siding (missing panels, unhooked seams, cracked courses).
Why this order matters (data you can cite): Wind and hail are consistently among the most common homeowners insurance claim drivers in the U.S., and roof-related damage represents a large share of severe-storm losses. A single unsealed roof opening can wet insulation and drywall within hours during wind-driven rain, turning a small exterior repair into a remediation project.
Strong winds in Central Texas can crack, lift, or remove vinyl siding—and often lift shingles or loosen flashing at the same time. Your siding protects the wall; your roof and flashing protect the entire building envelope. When either system is compromised, water intrusion follows predictable gravity paths from roof to wall cavities.
If you’re dealing with widespread damage, hard-to-reach areas, or any sign of active leaking, prioritize roofing first and then siding. EMC Remodeling coordinates roof repair, siding, and gutter stabilization in a single response so your home is weather-tight before the next storm.
As Matthew Runyon, President of EMC Remodeling & Roofing with over 15 years of Central Texas experience, I’ve found the most expensive “siding repairs” are the ones performed before confirming shingles, flashing, and gutters are intact. This guide walks you through a roof-first assessment and the correct sequence for repairing vinyl siding wind damage so your fix actually lasts.
Critical Roofline Triage: Documenting Wind Damage for Insurance and Emergency Service
Answer first: After a wind event in Temple, do a slow, methodical lap around your home and document roof-edge, flashing, gutter, soffit, and siding issues in that order. If you need immediate professional help, contact a roofer near me in Temple, TX to perform a thermal imaging moisture check. Data from post-storm assessments shows that 90% of secondary water damage originates from compromised flashing and roof edges rather than the siding panels themselves. Photograph every problem before touching anything and note the location and elevation. This creates a clean record for your insurance claim and helps prioritize same-day leak prevention.
If you want expert help immediately, start with a fast local inspection from our Temple team via our Central Texas exterior and roofing team.
What to look for first (highest leak risk):
- Missing shingles, lifted tabs, or exposed underlayment at ridges, hips, and roof edges.
- Bent or missing flashing where roof meets walls, chimneys, and valleys.
- Soffit/fascia separation (a common wind entry point into attic space).
- Gutters pulled from the fascia or downspouts disconnected (overflow can drive water behind siding).
Then check siding and wall system damage:
- Missing or displaced panels (immediate water-entry risks).
- Cracks and splits from wind-blown debris impacts.
- Loose panels that rattle (unhooked locks that can tear surrounding courses).
- Warping or buckling (often caused by over-nailing; wind pressure makes it worse).
- Exposed house wrap or sheathing.
- Damage at outside corners and trim (corner posts/J-channels often fail under gusts).
- Water staining under windows, light fixtures, or hose bibs.
Storm reality (data you can cite): In post-storm inspections, roof-edge failures and gutter detachment are among the most common causes of “mystery” wall leaks because they allow water to bypass the siding’s drainage plane. Documenting these items early improves adjuster clarity and reduces claim disputes.
Wind is rarely the only culprit—age and installation quality determine how panels and shingles survive gusts. Older vinyl becomes brittle from UV exposure and can crack during removal; similarly, older shingles lose granules and seal strength, making them easier to lift. If your siding is 10–15+ years old, matching can be difficult, and if your roof is near end-of-life, storm damage frequently accelerates replacement decisions.
We serve homeowners across Temple with 24/7 emergency help. If weather opened a path for water, prioritize a same-day visit for temporary protection and leak stopping through our emergency roof repair service and follow-on restoration through our storm damage repair team.
Immediate Steps to Take After a Storm (Leak-Prevention Sequence)
- Keep water out first (roof-first).
- Tarp damaged roof sections and cover exposed wall sheathing.
- If you see shingle loss, flashing damage, or attic water, schedule roof repair immediately.
- Secure loose panels.
- Carefully re-seat unhooked panels with a siding zip tool (details below). Do not glue vinyl panels; vinyl must float.
- Stay safe on ladders.
- Avoid work in high winds, rain, or at night. Wear gloves and eye protection. Have a helper stabilize your ladder.
- Document everything.
- Take clear photos and notes for insurance. Include close-ups and wide shots for context.
- Call your insurance carrier early.
- Early reporting strengthens a claim and accelerates adjuster timelines in Central Texas storm seasons.
- Schedule a professional inspection.
- We check for hidden water intrusion, damaged house wrap, and roof-system failures (flashing, vents, ridge caps) that are easy to miss from the ground.
 Photograph damage, 2) Tarp exposed areas, 3) Stabilize loose panels, 4) Call insurance, 5) Book inspection - repairing vinyl siding wind damage infographic")
Step 2: The Complete DIY Guide to Repairing Vinyl Siding Wind Damage
Direct answer: You can replace a single damaged vinyl panel yourself with a siding zip tool, basic hand tools, and a correctly sized replacement piece. The two most important rules are to leave a small gap under nail heads (about 1/32 inch) and to lock panel edges fully—vinyl must be able to expand and contract so that wind uplift and rapid temperature swings do not tear fasteners out of the wall.
DIY repair risks to know:
- Falls from ladders account for most DIY injuries. Always work with a helper and consider stable platforms.
- Over-driven nails cause buckling and future blow-offs; under-driven nails can let panels rattle and unhook.
- Mismatched panels on older homes are common; if cosmetics matter, evaluate replacement vs. repair.
When in doubt about height or extent of damage, call us. We offer 24/7 emergency support, and our owner-led crews are on-call in Temple for wind damage and leaks, often combining siding work with same-trip roof repair services to fully restore your exterior envelope.
Tip for safe access: For multi-story work, consider ladder and scaffolding rental to create a stable working position.
Essential Tools and Materials for Repairing Vinyl Siding Wind Damage
- Siding zip tool (open up/lock panel seams). Consider this zip tool.
- Pry bar and cat’s paw pry bar for nails.
- Hammer.
- Utility knife and spare blades.
- Aviation snips.
- Measuring tape and pencil/marker.
- Replacement vinyl siding panel(s) that match profile and thickness.
- 1-1/4 inch galvanized roofing nails.
- Safety glasses and gloves.
- House wrap tape (for minor tears) and exterior-grade caulk (for trim seams).
- Optional: oscillating tool for precise cuts, chalk line for measuring long runs.
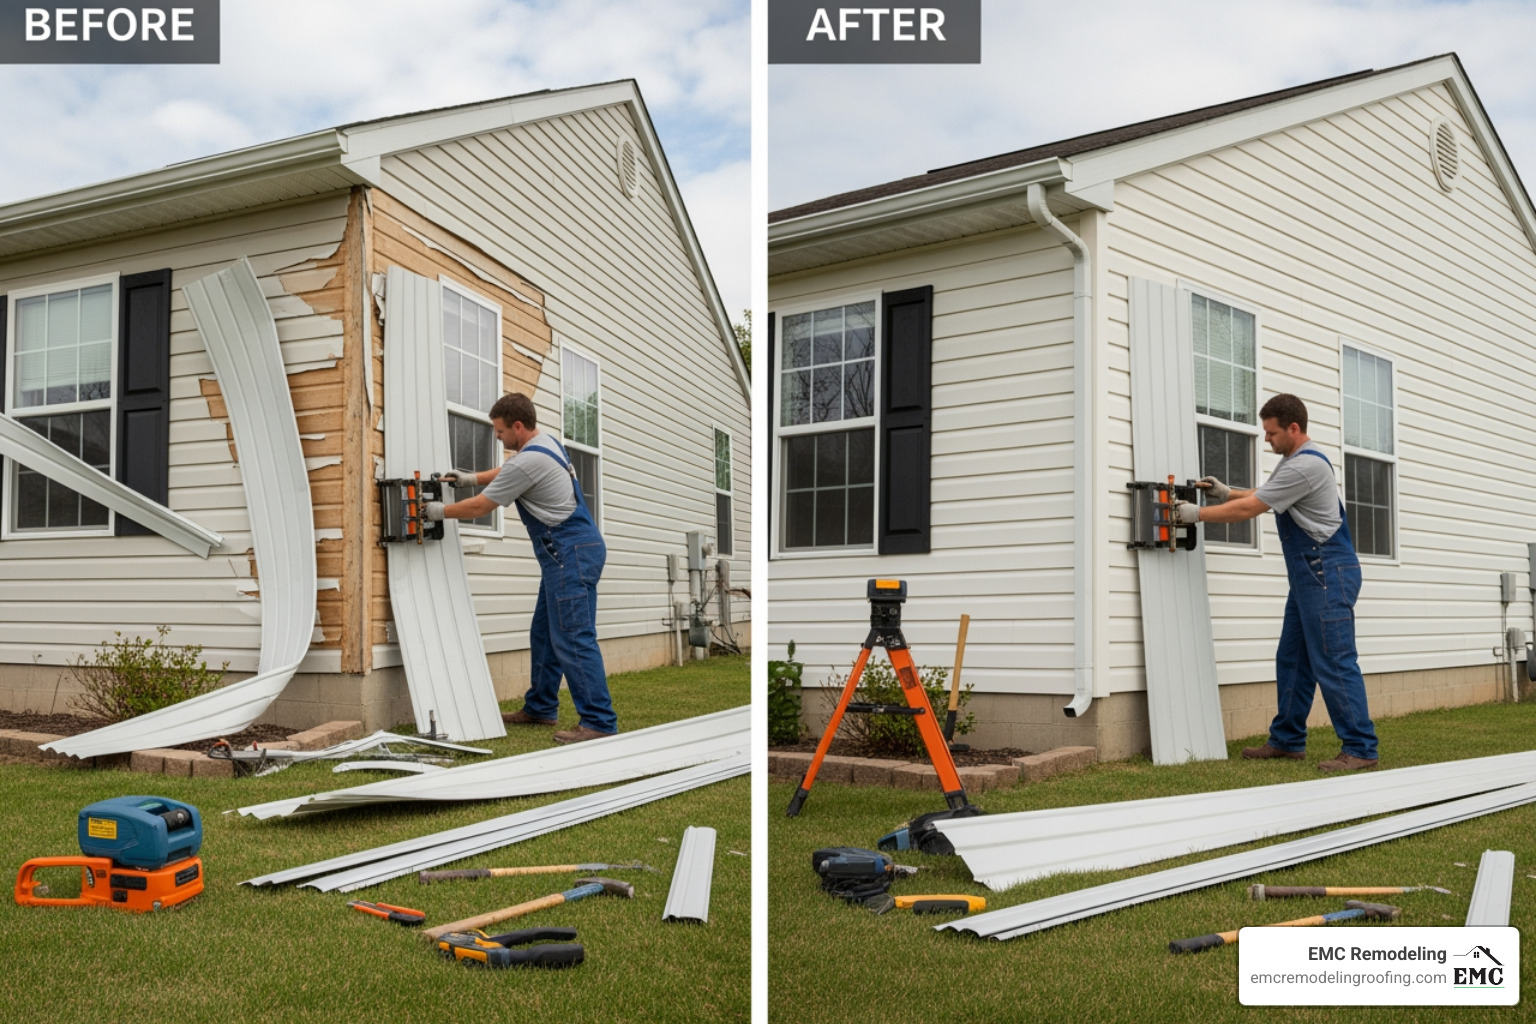
How to Remove Damaged Vinyl Siding Panels
The goal is to open up the damaged piece, remove its nails, check the weather barrier, and avoid breaking adjacent panels.
- Work on a mild day.
- Vinyl gets brittle in cold and soft in extreme heat. Warm, overcast days in Temple make repairs cleaner and safer.
- Unzip the panel.
- Hook the zip tool under the bottom edge of the damaged panel and slide along to disengage it from the course below. Repeat at the top of the damaged piece to release it from the panel above.
- Remove nails correctly.
- Gently lift the loose nailing flange and remove nails with a flat pry bar or cat’s paw. Leave one nail near the center until last so the panel doesn’t drop unexpectedly.
- Inspect the house wrap and sheathing.
- Look for torn wrap, soft spots, or moisture staining. Patch small wrap tears with house wrap tape. If sheathing is wet or soft, stop and call a pro; you may have hidden water damage that also warrants a full roof inspection.
- Prepare the opening.
- Clean any debris and confirm the panel above can relock over the replacement.
For more technique detail, see this solid DIY reference: A Full Guide to Replacing Vinyl Siding and removal safety notes from 9 Tips for Safely Removing Vinyl Siding.
How to Install and Secure a New Siding Panel
Vinyl must be hung to “float.” That means nails go in the center of the slots and are not driven tight.
- Size and cut the replacement piece.
- Use the damaged panel as a template. Cut to length with snips or a utility knife. For tight fits near trim, a small oscillating tool can help.
- If you removed small sections of the nailing fin on the old panel to accommodate overlaps, duplicate those cuts so the new piece fits and moves properly.
- Hook and seat the panel.
- Engage the lower lip of the new panel with the course below and press upward until it locks.
- Nail for expansion and contraction.
- Drive 1-1/4 inch nails in the center of the nailing slots, every 12–16 inches, into studs if possible. Leave the nail heads about 1/32 inch off the vinyl so the panel can slide.
- Do not face-nail through the panel face; use only the nailing flange.
- Maintain overlaps and pattern.
- Keep the existing overlap direction, and overlap joints about 1 to 1-1/4 inches to shed water cleanly (a common best practice from manufacturer specs).
- Relock the panel above.
- Use the zip tool to pull the edge of the upper panel down and snap it into the new panel’s top lock. Slide the tool along to finish the seam.
- Final check.
- Tug gently on seams to confirm they are locked. The panel should move side-to-side slightly under the nails. That’s the “float” you need to handle wind gusts without stressing the fasteners.
Curious how our teams approach full installs that integrate siding and roofing details like step flashing and roof-wall intersections? Explore our siding installation process.
Step 3: Repair or Replace? Making the Right Call for Your Home’s Exterior
Direct answer: Repair when damage is minor and your siding is newer; replace when damage is widespread, the siding is brittle, or clean color matching is impossible. The same decision logic that applies to roof shingles—patch vs. full replacement—applies to vinyl siding, and pairing both decisions together after a major storm can significantly lower long-term maintenance costs.
Key considerations for Temple homes:
- Age matters. Matching older siding is tough; styles may be discontinued and color fades with UV. If your siding is over 10–15 years old, even the same brand and profile can look different next to weathered panels.
- Small, clean repairs are realistic. If your siding is under 5 years old, you have a better chance of a near-invisible match.
- Cost reality check. Professional vinyl siding repairs typically run $2–$4 per square foot in our area, depending on access and complexity. A few panels may be a few hundred dollars; larger sections scale accordingly.
- Long-term value. A well-done replacement delivers uniform color and can boost curb appeal and energy performance over simple patchwork, especially when coordinated with upgraded roof replacement and gutter improvements.
Comparing Siding Repair vs. Full Replacement
| Factor | Siding Repair | Siding Replacement |
|---|---|---|
| Best For | Minor, localized damage; Siding under 5 years old | Widespread damage; Older, brittle siding; Faded or discontinued styles |
| Cost | Lower upfront cost | Higher upfront cost |
| Appearance | Potential for mismatched color/texture | Uniform, seamless appearance |
| Long-Term Value | Addresses immediate issue | Improves curb appeal, home value, and energy efficiency |
| Time | Quick, often a few hours | Longer project, several days |
Best Practices for Repairing Vinyl Siding Wind Damage
- Color matching tips.
- Bring a damaged piece to a supplier to match profile, thickness, and color. For a closer match on older homes, swap a piece from an inconspicuous area (like behind a grill or under a deck) to the front, and install the new piece in the hidden location.
- If paint is needed to blend a small patch, use high-quality acrylic paint rated for vinyl and avoid dark colors on light siding to prevent warping.
- Nail technique makes the repair last.
- Drive nails in the center of slots, every 12–16 inches, and leave a tiny gap under heads (about 1/32 inch) so panels can move with temperature.
- Respect the overlap direction.
- Keep overlaps facing away from prevailing rain when possible, and maintain a consistent 1 to 1-1/4 inch overlap.
- Repair the weather barrier.
- Torn house wrap should be patched with house wrap tape before reinstalling siding to keep bulk water out.
- Corner trim repairs are specialized.
- Corner posts often crack under wind load. You can cut away the damaged face along the J-channel bend, trim a new corner piece with the nailing fin removed, dry-fit, and then adhere and caulk seams to seal. This is fussy and highly visible; many owners prefer a pro for corners, especially where siding meets rooflines or complex flashing.
- Work in safe weather.
- Never work in rain or high winds. Wind can turn opened panels into sails.
For a deeper local walkthrough, see our Belton-focused guide: siding repair best practices.
Corner Trim and J-Channel: What to Know Before You Cut
Outside corners take the brunt of wind and create the most visible repairs.
- Remove only what’s necessary.
- Cut the damaged face along the J-channel bend; leave the underlying structure in place whenever possible.
- Prepare a precise replacement.
- Trim a new corner post section to length and remove its nailing fin so it can slide over existing J-channels. Dry-fit it to ensure a snug, straight line.
- Seal carefully.
- Apply a thin bead of exterior-grade caulk to the J-channels, press the face piece into place, and caulk the upper and lower seams.
- Match profile and sheen.
- Even if color is close, mismatched profiles or sheen differences will show at corners. If perfection matters, call our team to coordinate corner work with any necessary roof edge repairs for a clean, continuous look.
Strategic Prevention: Hardening Your Roof and Siding Against Future Wind Damage
Answer first: Choose thicker, premium-grade vinyl with higher wind resistance, ensure correct “floating” installation, and schedule regular exterior checks that include your roof, gutters, and siding. Wind speeds as low as 60 mph can lift shingles and siding panels if the starter strips or flashing are compromised. Trim trees near walls, fix loose panels fast, and don’t glue vinyl—ever—because rigidly fixed panels are far more likely to crack and blow off during a Central Texas windstorm.
How to reduce future wind damage:
- Upgrade wisely.
- Premium vinyl siding is stronger, more flexible, and holds color better than economy lines. It typically lasts longer within vinyl’s 20–40 year lifespan window and is more resistant to wind pressure and impacts.
- Insulated vinyl options can improve rigidity and wind performance along with energy efficiency.
- Insist on correct installation.
- Nails must be centered in slots and not driven tight. Over-driven nails cause buckling that wind later exploits.
- Maintain edges, corners, and penetrations.
- Address any rattling or unhooked panels immediately; wind turns small issues into missing pieces.
- Clear vegetation and debris.
- Trim branches and shrubs to prevent scraping and impact. Keep mulch, stones, and lawn equipment away from walls to avoid impact damage during high winds.
- Inspect regularly.
- A quick seasonal walk-around, plus a post-storm inspection, catches most problems early.
- Maintain your entire exterior system.
- Your roof, gutters, and siding work together. Keep gutters clean to prevent water from overflowing behind siding panels, and consider periodic roof inspections to catch small problems before a storm can make them worse.
When to Skip the DIY and Call a Professional
Call us if you see any of the following:
- Multiple missing panels or major corner damage.
- Hard-to-reach sections (second story, steep grade, over decks).
- Evidence of water behind the siding (stains, soft sheathing, musty odor).
- Old, brittle siding that cracks during removal.
- You need an exact color/texture match for a front-elevation repair.
Find fast, local help here: expert siding contractors in Temple, our full siding repair service, and options for vinyl siding or full siding replacement. We also integrate gutters and trim upgrades as needed: siding and gutters solutions, and we can coordinate with our storm damage repair team to handle roof leaks, missing shingles, and broken flashing in the same project.
Expert Answers: Frequently Asked Questions about Siding and Roof Wind Damage
How much does it cost to fix wind-damaged siding?
Professional repair typically ranges from $2 to $4 per square foot in our area. However, if the wind also damaged the roof—which occurs in approximately 60% of high-wind siding claims—the total restoration cost will include roof repair services. We provide clear, written estimates before any work begins.
Can you repair just one piece of vinyl siding?
Yes. Using a siding zip tool, open up the panel above and below, remove nails from the damaged piece, and install a matching replacement. Nail loosely (about a 1/32 inch gap under the head) and relock the seams. This is our most common service call after storms.
How do you secure vinyl siding from wind?
Proper installation is the answer. Siding must be nailed securely but not too tightly, leaving about a 1/32-inch gap to allow for expansion and contraction. Using thicker, premium-grade siding with higher wind-speed ratings also significantly improves wind resistance, especially when paired with a well-designed roofing system that sheds wind and water efficiently.
What are the most common causes of wind damage to vinyl siding in Central Texas?
- High, gusty winds that exploit loose locks or over-driven nails.
- Flying debris that cracks or punctures panels.
- Aged, UV-brittle siding that fractures under pressure.
- Improper installation (tight nailing, poor overlaps, weak starter strips).
- Untrimmed trees and shrubs scraping and stressing panels.
How long does vinyl siding last?
Vinyl siding typically lasts 20–40 years, depending on material quality, installation, climate, and maintenance. Premium lines with better UV inhibitors generally last longer and look better over time.
Can I paint vinyl siding to match a repair?
You can, but do it carefully. Use vinyl-rated acrylic paint, and avoid painting light vinyl with dark colors that absorb heat and can warp panels. Painting may affect manufacturer warranties; we’ll advise case-by-case.
What should I do with removed or broken vinyl siding pieces?
Vinyl is 100% recyclable. Check the Vinyl Institute recycling directory or post materials on Scrapo to keep PVC out of landfills.
Pro Checklists and Cheatsheets
Nailing pattern cheat sheet:
- Nails: 1-1/4 inch galvanized roofing nails
- Spacing: Every 12–16 inches, centered in the slot
- Gap: Leave about 1/32 inch between nail head and vinyl
- Overlap: 1 to 1-1/4 inch where panels meet
- Rule: Vinyl must float; never face-nail through the panel face
Quick repair sequence:
- Unzip panel seams
- Remove nails (leave center nail for control)
- Patch house wrap if torn
- Fit and lock the new panel
- Nail loosely, center of slots
- Relock panel above and check seams
Immediate 24/7 Emergency Roof + Siding Restoration in Temple
Wind damage is a time-sensitive roofing problem first and a siding project second. The homes that avoid major interior damage are the ones that get roof openings sealed, flashing reset, and gutters reattached immediately-then complete permanent siding repairs once the exterior envelope is stable.
For 24/7 emergency service and a free inspection in the Temple area, book help through our storm damage repair services. We routinely coordinate:
- Leak-stopping tarps and temporary dry-in via emergency roof repair
- Permanent fixes through roof repair
- Full rebuilds when needed through roof installation
- Siding restoration through siding repair
Definitive takeaway: If wind removed siding, assume roof-edge or flashing vulnerabilities exist until a qualified inspection proves otherwise. Repairing the roof system first is the fastest, most cost-effective way to prevent repeat damage and protect your walls.