Don’t Let a Small Drip Turn into a Disaster
A leaking roof is a homeowner’s nightmare, but prompt action can prevent a small issue from escalating into major structural damage, mold growth, and costly repairs. Asphalt shingles are the most common roofing material, used on nearly 70% of homes in the United States, which makes this guide to roof shingles leak repair essential for most homeowners. As a trusted local partner in Central Texas, EMC Remodeling offers comprehensive, emergency-ready roofing services to protect your home before minor leaks become major disasters.
This guide provides a step-by-step, data-backed approach to identifying and fixing common shingle roof leaks yourself, while clearly explaining when it is safer and more cost-effective to call a professional. Homeowners who act within the first 24–48 hours of noticing a leak routinely avoid thousands of dollars in downstream damage to framing, insulation, and interior finishes.
Quick Action Steps for Roof Shingles Leak Repair:
- Locate the leak: Check your attic for water trails, wet insulation, or active drips during or right after rainfall.
- Inspect your roof: From the ground, look for missing, cracked, or curled shingles, especially near valleys and penetrations.
- Make a temporary patch: Use a tarp or roofing tape to stop immediate water entry until a permanent repair is possible.
- Replace damaged shingles: Remove old nails, slide in new shingles, and seal them with roofing cement.
- Call a professional: If damage is widespread, safety is a concern, or leaks persist, schedule expert help immediately.
Addressing a minor roof leak quickly can cost between $300 and $1,000, which is significantly less than the $1,000 to $4,000+ price tag of major repairs caused by rotted wood, soaked insulation, and mold remediation. While many common shingle leaks are DIY-friendly, this guide will also help you know when to call for our expert roofing services. With over 15 years of hands-on experience on Central Texas roofs, our team is here to share proven methods and help you protect your most valuable investment.
 Water stains on ceiling or walls (brown or yellow discoloration), 2) Missing or damaged shingles visible from ground level, 3) Granules collecting in gutters (small pebble-like pieces), 4) Curled or cracked shingle edges, 5) Wet spots or mold in attic space. Each sign includes a simple icon and brief description of what to look for during inspection. - roof shingles leak repair infographic")
Pinpointing the Problem: How to Find the Source of Your Roof Leak
Finding the exact source of a roof leak is the most crucial step in any roof shingles leak repair. Water travels, so a stain on your ceiling is often not directly below the leak’s entry point. It can run down rafters or beams before becoming visible inside your home.
The Indoor Investigation: Attic and Interior Clues
Start your investigation inside, usually in the attic, where the first signs of water intrusion appear.
- Attic inspection: Use a flashlight to look for damp spots, water trails, or active drips on the underside of the roof decking and rafters.
- Water stains: Look for brown or yellow discoloration on ceilings and walls, which indicates where water has been pooling.
- Black marks or mold: Black marks can signal mold growth, a health hazard. If you find mold, contact a professional for remediation.
- Wet insulation: Damp or matted insulation is a strong indicator of a leak directly above it.
Trace any watermarks upward to find the potential entry point, which may be several feet away from the interior stain. For more guidance, see our article on More info about roof leak detection.
The Outdoor Reconnaissance: Exterior Inspection
After checking inside, inspect your roof’s exterior from the ground (using binoculars for safety).
- Damaged shingles: Scan for missing, cracked, curled, or buckled shingles. These are common entry points for water.
- Cracked flashing: Flashing is the metal seal around chimneys, vents, and skylights. Inspect it for cracks, rust, or gaps. Compromised flashing is a frequent cause of leaks, especially Roof leaking around chimney.
- Clogged gutters: Gutters blocked with debris can cause water to back up and seep under the roof’s edge.
The Garden Hose Test: Simulating the Rain
If the source is still not obvious, the “garden hose test” can pinpoint it. You’ll need a helper for this.
- Position yourselves: One person goes on the roof with a hose, and the other goes inside the attic with a flashlight.
- Start low: Begin spraying water on the roof just above the area where the leak appears inside.
- Isolate sections: Slowly move the water spray up the roof, isolating small sections at a time. Have your helper watch for drips.
- Mark the spot: Once your helper sees water enter the attic, you’ve found the entry point. Mark the spot on the roof.
Common Causes of Shingle Roof Leaks
Asphalt shingles are the most popular roofing material in the U.S., used on nearly 70% of homes according to the National Roofing Contractors Association. Understanding why they leak is key to prevention and repair.
- Aged or sun-damaged shingles: Over time, shingles become brittle and lose their protective granules, making them prone to cracking.
- Cracked or curled shingles: Wind and UV exposure can cause shingles to crack or curl, allowing water to get underneath.
- Missing shingles: High winds from storm damage can tear shingles off, exposing the roof deck.
- Damaged flashing: The sealant around flashing can dry out and crack, or the metal itself can be damaged, allowing water intrusion.
- Improperly sealed roof valleys: Valleys channel large amounts of water, and any flaw in their installation can lead to major leaks.
- Clogged gutters: When gutters overflow, water backs up against the roof edge and can force its way under shingles.
Gearing Up: Your DIY Roof Repair Toolkit
Before starting any roof shingles leak repair, gathering the right tools and materials is crucial for a safe and effective job. Having everything ready saves time and reduces risks.

Essential Tools and Materials for Roof Shingles Leak Repair
Here’s a checklist for common shingle repairs:
- Safety Gear: Safety harness, non-slip boots, gloves, and safety goggles.
- Ladder: A sturdy extension ladder placed on level ground.
- Prying Tools: Hammer and a flat pry bar for removing nails.
- Cutting Tool: Utility knife for trimming shingles.
- Sealant & Applicators: Caulking gun, high-quality roofing cement, and a putty knife. You can find these at stores like The Home Depot.
- Replacement Materials: Shingles that match your current roof and 1 ¼-inch galvanized roofing nails.
- Emergency Patch: A heavy-duty tarp for temporary fixes.
Your safety is the top priority. Always review OSHA safety regulations before starting. If you feel uncomfortable or unsure about working at heights, it’s best to call a professional.
Step-by-Step Guide to Roof Shingles Leak Repair
With your tools ready, it’s time to get to work. Safety is paramount: always work on a dry, non-windy day and have a spotter. Never attempt roof shingles leak repair on a wet roof. While a professional repair can cost $300 to $1,000, a successful DIY fix can save significantly on labor.

How to Make a Temporary Emergency Patch
If a leak appears during a storm, you need to stop the water immediately. These temporary fixes can prevent further damage until a permanent emergency roof repair is possible.
- Plastic Tarp Method: If it’s safe, stretch a heavy-duty tarp over the leak area, extending it several feet in all directions. Secure it with 2x4s or heavy staples.
- Roofing Tape: For small cracks, clean and dry the area, then apply self-adhesive waterproof roofing tape firmly over the damage.
- Roofing Cement: For minor cracks, apply a bead of roofing cement into and over the crack, smoothing it with a putty knife. This is a short-term fix.
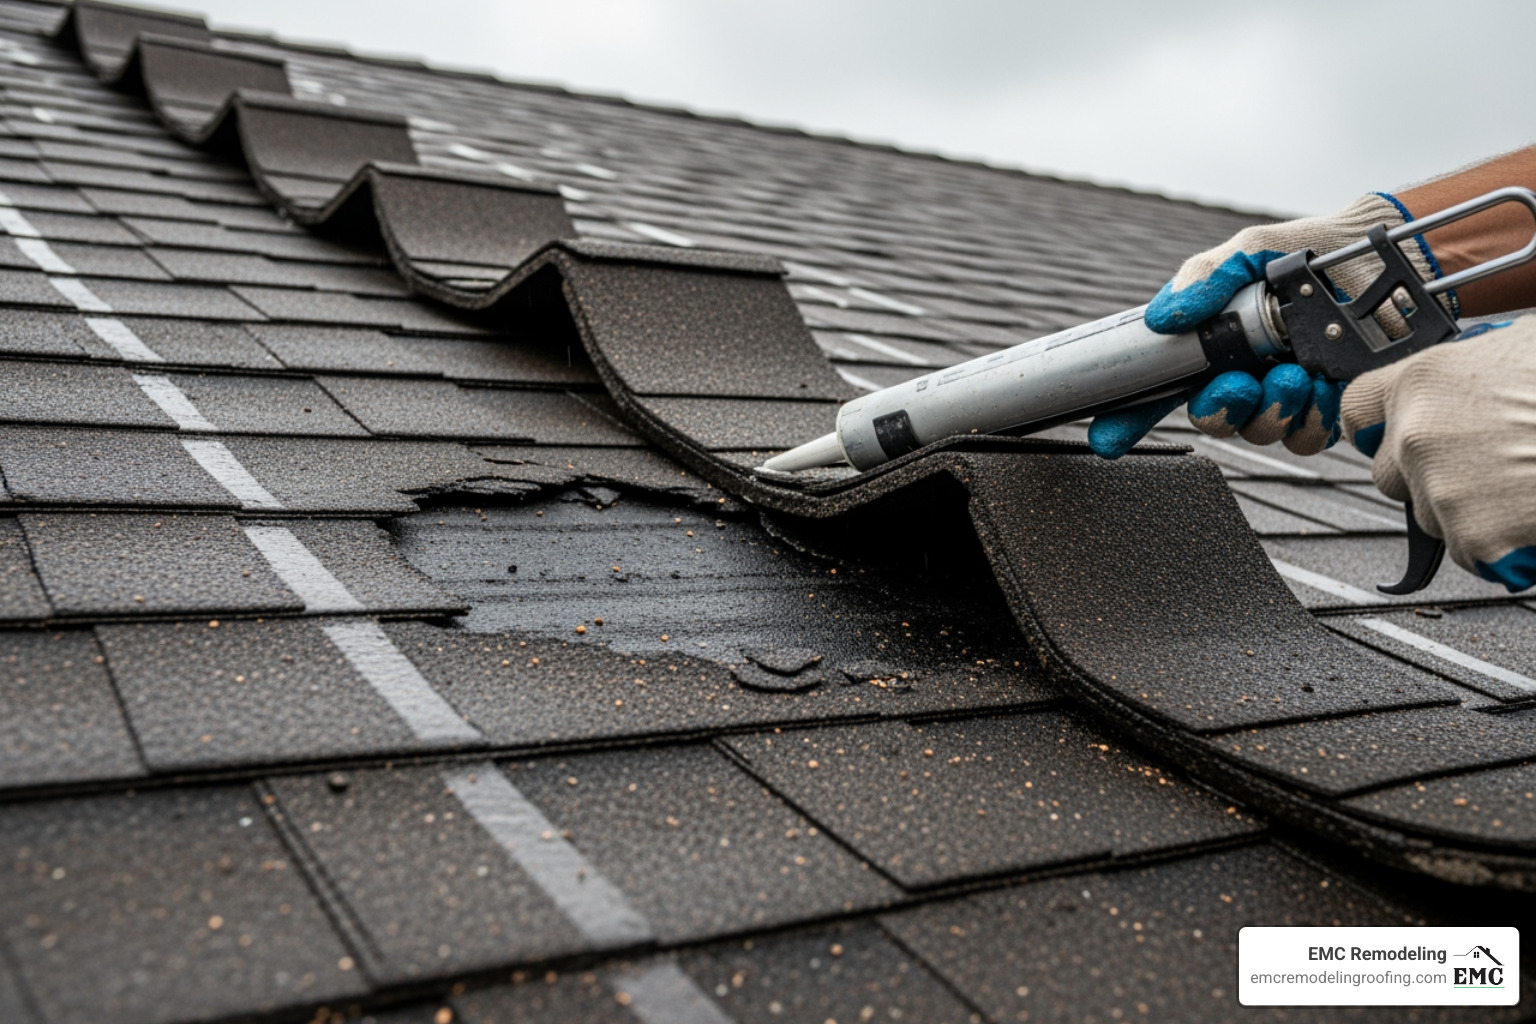
How to Replace a Damaged or Missing Shingle
This is one of the most common DIY roof shingles leak repair tasks.
- Lift Surrounding Shingles: On a warm day (above 40°F), gently lift the shingles above and around the damaged one to avoid cracking them.
- Remove Nails: Use a pry bar to slide under the shingle and carefully pry out the four nails holding it in place.
- Remove Old Shingle: Slide the damaged shingle out.
- Inspect Underlayment: Check the roofing felt underneath for damage. Patch any tears with new felt and roofing cement.
- Slide in New Shingle: Slide the new shingle into place, aligning it with the surrounding shingles.
- Secure with Nails: Fasten the new shingle with four 1 ¼-inch galvanized roofing nails, placing them just below the tar line of the shingle above.
- Seal Nail Heads: Apply a dab of roofing cement over each nail head for a waterproof seal, then press the overlapping shingle down firmly.
For a visual walkthrough, View a detailed guide on replacing shingles.
How to Fix Curled or Cracked Shingles
If caught early, you can often repair curled or cracked shingles without replacing them.
- For Curled Shingles: Apply a bead of roofing cement under the curled edge, press it down firmly, and place a brick on it for 24 hours to help it set.
- For Cracked Shingles: Clean the area and apply roofing cement into and over the crack. Use a putty knife to spread it smoothly. This simple fix for roof shingles can prolong your roof’s life.
DIY vs. The Pros: When to Call for Professional Help
While it’s rewarding to tackle minor roof shingles leak repair projects, it’s crucial to know your limits. Some situations require professional expertise to ensure a safe, long-lasting solution and to avoid making the problem worse.
When to Call a Professional for Roof Shingles Leak Repair
Knowing when to call a professional is a sign of wisdom, not weakness. Contact us at EMC Remodeling if you encounter any of the following:
- Widespread Damage: If you find multiple leaks or more than a few damaged shingles, it likely points to a systemic issue that requires a professional assessment.
- An Old Roof: If your roof is over 20 years old, repairs may be a temporary fix for a roof that needs replacement.
- A Sagging Roof Deck: This is a serious structural red flag indicating rotted wood or support failure. It requires immediate professional inspection.
- Persistent Leaks: If a DIY repair fails, an expert can use advanced tools for accurate roof leak detection to find the true source.
- Discomfort with Heights: Your safety is paramount. Working on a roof is dangerous; reviewing OSHA safety regulations highlights the risks. If you’re uneasy, do not attempt the repair.
- Complex Repairs: Damage to flashing, valleys, or around skylights and chimneys requires specialized skills to create a watertight seal.
- Signs of Mold or Rot: Significant mold or rotted wood in your attic needs professional remediation.
- Major Storm Damage: After a severe storm, a professional inspection is crucial to identify all damage, even what’s not immediately visible. Our team specializes in storm damage repair.
For homeowners in Central Texas, our expert roofers in Temple, TX are equipped to handle any roof shingles leak repair, from minor fixes to complete replacements.
Proactive Protection: Preventing Future Shingle Roof Leaks
The best repair is the one you never have to make. A proactive approach to roof maintenance is the most effective way to extend your roof’s lifespan and prevent future leaks and the need for roof shingles leak repair.
Perform Regular Maintenance and Inspections
Regular inspections are your first line of defense. Watch this video on regular maintenance for helpful tips.
- Twice-Yearly Visual Checks: In the spring and fall, inspect your roof from the ground with binoculars. Look for cracked, curled, or missing shingles.
- Check Flashing and Sealant: Examine the seals around vents, chimneys, and skylights for any signs of cracking or deterioration.
- Look for Granule Loss: An excess of shingle granules in your gutters indicates that your shingles are aging and losing their protective layer.
- Schedule Professional Inspections: Every 2-3 years, have a professional perform a roof and attic inspection. An expert can spot subtle issues an untrained eye might miss and help maintain your warranty.
Keep Gutters Clean and Trees Trimmed
Two simple tasks can dramatically reduce your risk of roof leaks:
- Clean Your Gutters: Clogged gutters cause water to back up and seep under the roof’s edge, potentially damaging the structure. Clean them at least twice a year.
- Trim Overhanging Branches: Branches can rub against shingles, causing wear, or fall during storms, causing direct damage. They also drop debris that clogs gutters. Keeping trees trimmed protects your roof from physical damage.
Frequently Asked Questions about Roof Shingle Leak Repair
Here are answers to common questions we get from homeowners in Temple, TX, about leaky roofs.
How much does it cost to repair a shingle roof leak?
The cost for a professional roof shingles leak repair varies. Minor fixes, like replacing a few shingles or sealing a crack, typically range from $300 to $1,000. More extensive damage involving structural work or flashing can cost $1,000 to $4,000 or more. A DIY repair saves on labor but will still have material costs.
Can I put new shingles over old ones to stop a leak?
Layering new shingles over old ones is not recommended for leak repair. It adds excessive weight to the roof structure and can trap moisture, which often masks and worsens underlying damage to the roof deck. The correct method is to remove the old shingles, inspect the area, and then install new ones.
How long does a shingle roof repair take?
The time required for a roof shingles leak repair depends on the job’s complexity. A simple DIY fix like replacing one or two shingles might take 1-3 hours. More complex professional repairs involving flashing or multiple damaged areas could take a full day or longer. An emergency patch can often be applied in under an hour.
Secure Your Home with Expert Roof Repair
A leaky asphalt shingle roof is a time-sensitive problem that demands immediate attention, especially during Central Texas storm season. Rapid response within hours, not days, is the single most effective way to limit structural damage, prevent mold growth, and avoid multi-thousand-dollar interior restoration bills. By following this guide, you can confidently tackle minor roof shingles leak repair tasks and, just as importantly, recognize when professional intervention is critical for your safety and your home’s long-term performance.
For complex issues, widespread storm damage, or if you need 24/7 emergency service in the Temple, TX area, the family-operated team at EMC Remodeling is ready to help with code-compliant repairs, detailed inspections, and insurance-ready documentation. Our local crews handle everything from targeted roof repair service to full roof installation and replacement, ensuring your home is protected in every season.
Have an active leak or uncertain damage after a storm? Call us anytime at (770) 999-0095 for fast, emergency-ready support, or schedule your expert roof repair service today to keep your roof strong, dry, and storm-resilient for years to come.