What Are Roof Valleys and Why Do They Leak?
Roof valley repair is one of the most critical home maintenance tasks Texas homeowners face. When water starts dripping through your ceiling or you notice mysterious stains spreading across your walls, there’s a good chance your roof valley is the culprit.
Quick Answer for Roof Valley Repair:
- Identify the problem – Look for water stains, damaged flashing, or debris buildup
- Safety first – Use proper fall protection and work only in dry conditions
- Remove damaged materials – Strip old shingles and flashing from the valley area
- Install waterproof barrier – Apply ice and water shield underlayment
- Replace metal flashing – Use galvanized steel, aluminum, or copper flashing
- Reinstall shingles – Cut and seal properly over the new flashing
- Consider professional help – Complex repairs often require expert installation
A roof valley is the V-shaped channel where two sloped roof sections meet. These areas handle massive amounts of water during storms – imagine all the rain from two roof planes funneling into one narrow channel. This concentrated water flow makes valleys particularly vulnerable to leaks.
The physics are simple but devastating. When water can’t flow freely through a valley due to damaged flashing, debris buildup, or improper installation, it backs up under your shingles. From there, it seeps through your roof deck and into your home, causing water damage that can cost thousands to repair.
For Central Texas homeowners dealing with intense summer storms and occasional ice events, valley problems often develop quickly. Professional roof repair services can prevent small issues from becoming major disasters.
I’m Matthew Runyon, President of EMC Remodeling & Roofing, with over 15 years of experience helping Central Texas families protect their homes through quality roof valley repair and comprehensive roofing solutions. Our team at EMC Remodeling has seen how proper valley maintenance can save homeowners from costly water damage and structural issues.

Glossary for roof valley repair:
How to Spot a Problem: Signs of a Leaking Roof Valley
Your roof valley might be silently causing damage right now, and you wouldn’t even know it. The tricky thing about roof valley repair issues is that they often start small and hidden, then suddenly announce themselves with a dramatic ceiling stain or, worse, water dripping onto your dining room table during Sunday dinner.
The good news? Your home will usually give you plenty of warning signs if you know what to look for. After helping hundreds of Central Texas families with emergency roof repairs, I’ve learned that catching these problems early can save you thousands of dollars in water damage.
Let’s start where most homeowners first notice trouble – inside your home. Water stains on ceilings and walls are like your house waving a white flag, especially when they appear as those telltale yellow or brown rings directly below where your roof valleys sit. Even a small stain the size of a dinner plate means water has already traveled through your roof deck, past insulation, and into your living space.
Head up to your attic if you can access it safely. Damp or soggy insulation is a dead giveaway that water is getting where it shouldn’t. Wet insulation not only loses its ability to keep your home comfortable, but it also creates the perfect environment for mold growth. Speaking of mold, that musty smell or visible dark spots on your ceiling, walls, or attic rafters means you’ve got a moisture problem that’s been brewing for a while.

Water stains on your ceiling are a classic sign of a leaking roof valley, indicating that water has breached your roofing system and is making its way into your home.
Sometimes the exterior of your roof tells the story before water ever makes it inside. From the ground or a ladder (always prioritize safety!), look for cracked, loose, or missing shingles right in the valley area. These spots take a beating from concentrated water flow, especially during those intense Texas thunderstorms we know so well.
Rusted or damaged metal flashing is another red flag. That metal barrier is your valley’s first line of defense, but it can corrode, bend, or develop small cracks over time. Even a hairline crack can turn into a major leak during the next heavy rain.
Here’s something many homeowners overlook: debris buildup in valleys. Those fallen leaves, pine needles, and small branches might look harmless, but they act like tiny dams. When water can’t flow freely down your valley, it pools up and finds creative ways to get under your shingles and flashing.
Open vs. Closed Valleys: What’s the Difference?
Not all roof valleys are built the same way, and understanding your valley type helps you know what problems to watch for. Think of it like knowing whether you drive a sedan or a pickup truck – they both get you where you need to go, but they have different maintenance needs.
Open valleys show their metal flashing like a proud smile. The metal channel sits right there in the open, with shingles trimmed neatly along both edges and sealed tight. Water flows down this exposed metal highway straight to your gutters. It’s efficient and handles heavy water flow beautifully.
Closed valleys keep their flashing hidden under a blanket of shingles. The shingles from both roof sections either weave together like a basket or get cut to meet in the middle, completely covering the metal underneath. It creates a smoother, more uniform look that many homeowners prefer.
Both designs work well when installed properly, but they fail in different ways. Open valleys typically leak when the exposed metal flashing rusts, cracks, or gets punctured by falling debris. The sealant along the shingle edges can also break down over time, letting water sneak underneath.
Closed valleys usually develop problems from the shingles themselves. Since you can’t see the flashing, issues like improper installation, cracked shingles, or poor sealing often go unnoticed until water starts showing up inside your home. The woven style can sometimes struggle with really heavy water flow, while the cut style depends entirely on perfect sealing along those cut edges.
If you’re noticing any of these warning signs, don’t wait for the problem to get worse. A professional roof inspection can pinpoint exactly what’s going wrong and help you understand your repair options before a small leak becomes a major headache.
The Step-by-Step Guide to Roof Valley Repair
When you’re facing a roof valley repair, having a clear plan makes all the difference between a patch job that fails next season and a lasting solution that protects your home for years. While this process requires careful attention to detail, homeowners with solid DIY skills can tackle smaller repairs successfully.
That said, there’s no shame in calling the professionals at EMC Remodeling when the damage looks extensive or you’re not comfortable working at height. We’ve seen too many well-intentioned repairs turn into bigger problems when safety gets compromised or steps get skipped.
Safety First
Let’s be honest – roof work scares most people, and it should. Falls from roofs send thousands of homeowners to emergency rooms every year. Before you even touch that ladder, let’s talk about keeping you safe up there.
Always use a fall-arrest harness – this isn’t optional, especially if your roof has any significant pitch. A proper harness system needs a secure anchor point that can handle sudden impact loads. Many homeowners skip this step thinking they’ll just be careful, but accidents happen in split seconds.
Wear non-skid shoes with aggressive tread patterns designed for roofing work. Regular sneakers or work boots can turn deadly on wet or dusty shingles. Even experienced roofers respect how slippery a seemingly dry roof can become.
Work only in dry, calm weather conditions. Morning dew, recent rain, or gusty winds can transform routine roof work into a dangerous situation. If there’s any chance of weather changes, wait for a better day. Your safety is worth more than rushing the repair.
Having a partner on the ground isn’t just helpful – it’s potentially life-saving. They can spot hazards you can’t see, hand up tools, and call for help if something goes wrong.
Tools and Materials
Success in roof valley repair starts with having the right equipment before you climb up. Nothing’s more frustrating than realizing you need another tool when you’re already on the roof.
Your pry bar becomes your best friend for gently lifting old shingles without destroying the good ones around them. A roofing hammer works better than a regular hammer because it’s designed for the specific tasks you’ll face. Utility knives with hook blades slice through asphalt shingles like butter – regular straight blades just don’t cut it (pun intended).
For materials, metal flashing forms the heart of your repair. Galvanized steel offers good value, while aluminum resists corrosion better, and copper lasts longest but costs more. Waterproof underlayment – specifically ice and water shield – creates that crucial backup barrier that separates a good repair from a great one.
Roofing nails need to be hot-dipped galvanized or stainless steel to prevent rust stains and premature failure. Roofing cement seals the final connections, but don’t rely on it as your primary waterproofing – it’s the finishing touch, not the foundation.

Proper safety equipment isn’t optional – it’s what keeps you off the evening news and able to enjoy your completed repair.
Key Steps for a DIY Roof Valley Repair
Now comes the actual work. Take your time with each step – rushing through roof valley repair almost always leads to callbacks and frustrated homeowners.
Step 1: Clean and Inspect the Area
Start by turning your valley into a clean workspace. Remove every leaf, twig, and piece of debris that’s accumulated there. Use a wire brush to scrub away any moss or algae growth that might hide damage underneath.
This cleaning phase reveals the real extent of your problem. Sometimes what looks like major damage from the ground turns out to be minor once you clear away years of buildup. Other times, you’ll find issues that weren’t visible from below. Take photos of what you find – they’ll help you track your progress and document the repair for insurance purposes if needed.
Step 2: Remove Damaged Shingles and Flashing
Here’s where patience pays off. Use your pry bar to gently lift damaged shingles, working slowly to avoid tearing healthy shingles that you want to keep. Each shingle connects to several others, so rushing this step can create unnecessary extra work.
Once the shingles are out of the way, the old flashing usually comes up easily. Look for patterns in how it failed – rust spots, fatigue cracks, or poor installation techniques. Understanding what went wrong helps you avoid repeating the same mistakes.
Step 3: Install a Waterproof Membrane
This step separates amateur repairs from professional-quality work. The ice and water shield creates a rubberized barrier that seals around nail penetrations and provides backup protection if your primary flashing ever develops problems.
Apply it carefully, smoothing out any wrinkles or air bubbles that could create weak spots. The membrane should extend well beyond where your new flashing will sit, creating overlapping layers of protection that work together.
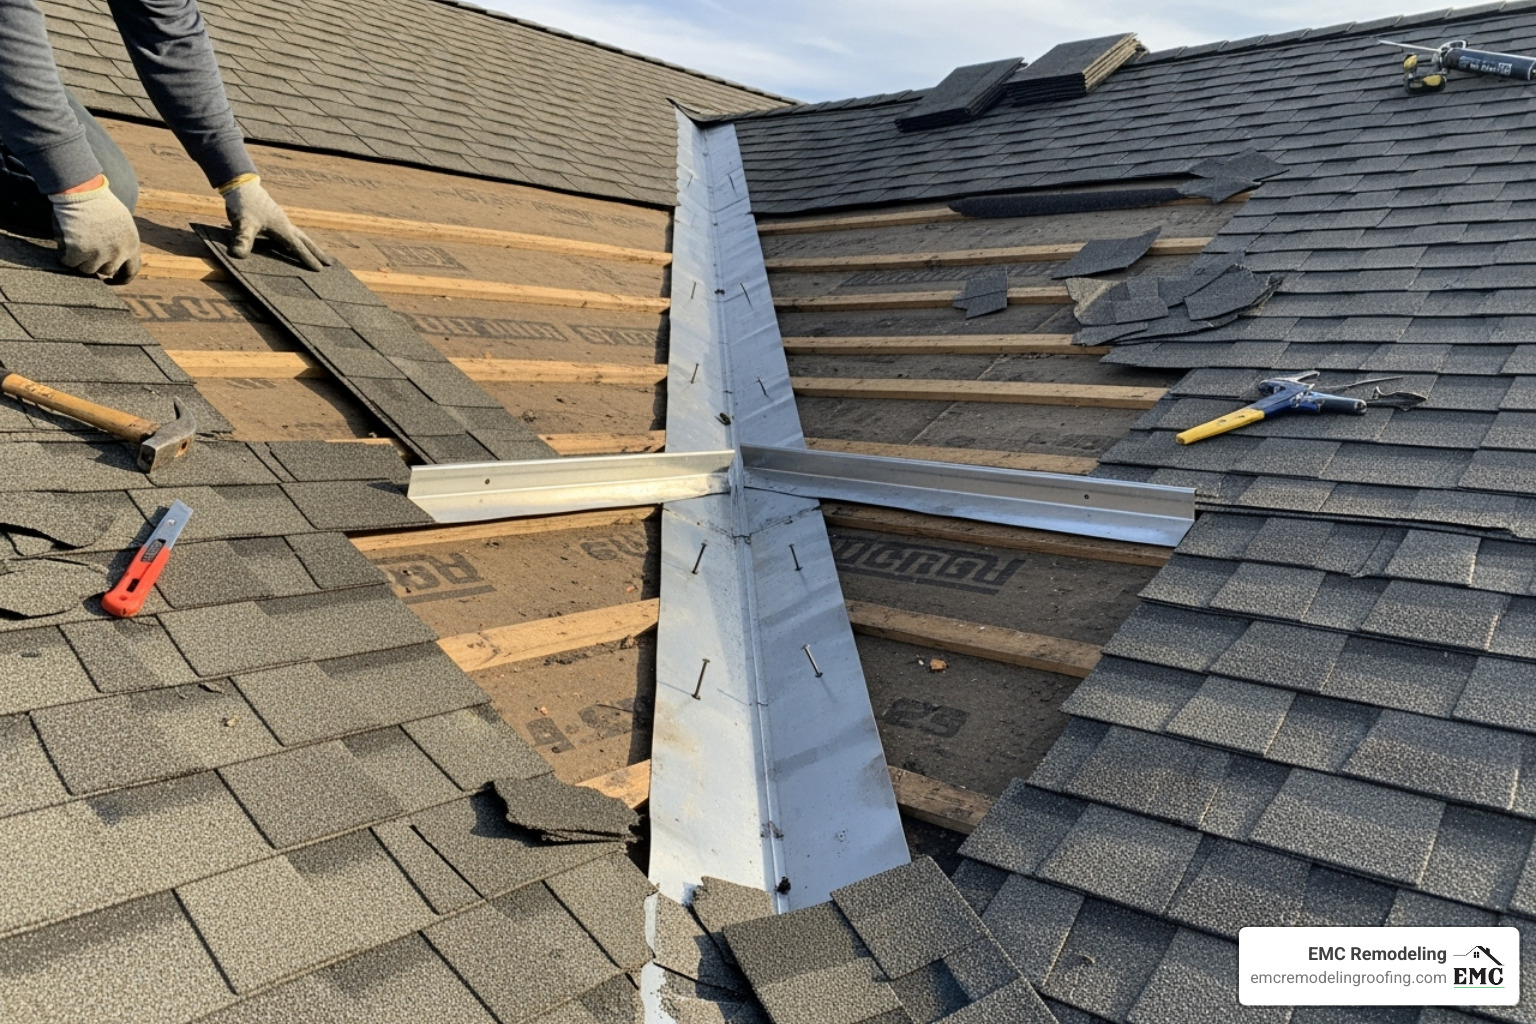
Step 4: Install New Metal Flashing
Position your new flashing carefully in the valley’s center, ensuring it follows the natural water flow path. Secure it according to NRCA guidelines with nails placed far enough from the center channel that they’ll be covered by your shingles.
If you need multiple pieces of flashing, overlap them by at least 2 inches with the upper piece overlapping the lower one – water should never be able to flow backward under a seam.
Step 5: Re-install Shingles
The final step requires precision cutting and careful sealing. For open valleys, cut your shingles at a slight angle to create that consistent exposed metal channel that guides water flow. The channel should widen as it approaches the gutter – about 1/8 inch per foot of valley length.
Seal the cut edges where shingles meet flashing with roofing cement, but keep the cement smooth so it doesn’t create dams that could trap water. Each shingle should overlap the one below it enough to prevent wind-driven rain from finding gaps.
This methodical approach transforms a potentially problematic area into a reliable part of your roofing system that handles Central Texas storms with confidence.
DIY vs. Professional Repair: Making the Right Call
When you find water dripping from your ceiling or spot damaged flashing in your roof valley, you face a critical decision: tackle the roof valley repair yourself or call in the professionals? It’s a choice that goes far beyond just saving a few dollars upfront.
As someone who’s been in the roofing business for over 15 years, I’ve seen both impressive DIY successes and costly disasters. The truth is, while some homeowners absolutely have the skills and tools to handle valley repairs, others would be better served by professional roofing contractors in Temple, TX who understand the complexities involved.

Choosing between DIY and professional repair for your roof valley involves weighing cost, time, safety, and the long-term quality of the repair.
Cost considerations vary dramatically based on the scope of damage. A small roof valley repair that involves replacing sealant and minor flashing work might run you $350 to $500 when done professionally. However, if you need complete flashing replacement, new underlayment, and surrounding shingle work, expect costs between $500 and $1,000 per valley.
DIY repairs can cut material costs significantly – you might spend $150 to $300 on supplies for a basic repair. But here’s where it gets tricky: if your DIY attempt fails or causes additional damage, you could end up paying double for both your materials and a professional fix.
Time investment is another crucial factor. Professional roofers can typically complete a standard valley repair in half a day, while a full valley replacement takes about one full day. Two valleys usually require around two days of work.
For DIYers, especially those new to roofing, the same job often takes much longer. You’ll need time to research proper techniques, gather materials, and work more cautiously. What takes a pro four hours might take you an entire weekend – assuming good weather cooperates.
Safety risks cannot be overstated. Professional roofers have specialized equipment, years of experience working at height, and comprehensive insurance coverage. One slip on a steep roof can result in serious injury or worse. We’ve seen too many homeowners end up in the hospital because they underestimated the dangers of roof work.
Why a Comprehensive Approach to Roof Valley Repair is Crucial
Here’s where many well-meaning homeowners go wrong: they spot a small crack or loose shingle and think a quick patch job will solve everything. Unfortunately, roof valley repair doesn’t work that way.
Patching creates temporary illusions, not permanent solutions. When you simply slap some roofing cement over a visible crack, you’re treating the symptom, not the disease. That sealant will break down under Texas sun and temperature swings, often within just a few months. Meanwhile, water continues infiltrating your roof system, causing hidden damage that’s far more expensive to fix later.
I’ve walked countless homeowners through this exact scenario. They’ll point to a small area and ask, “Can’t we just fix this little spot?” The honest answer is that visible damage usually indicates much larger underlying problems. Water doesn’t just affect the exact spot where you see it – it travels along roof decking, soaks into insulation, and can compromise structural elements you can’t even see.
A proper repair integrates multiple roofing system components. Professional roof valley repair involves carefully removing old materials, inspecting the underlying structure for rot or damage, installing new waterproof underlayment, and then methodically installing new flashing and shingles. Each layer must work harmoniously with the others to create a truly waterproof barrier.
This comprehensive approach addresses the entire vulnerable area, not just the obvious problem spots. It ensures proper water channeling and prevents future leaks by reinforcing the complete valley system. For repairs that truly protect your home long-term, trust an experienced Roof Repair Service.
When to Call for Emergency Help
Some situations demand immediate professional intervention, regardless of your DIY skills or budget concerns. Recognizing these emergency scenarios can save your home from catastrophic damage.
Active water intrusion requires immediate action. If you see water actively dripping or flowing into your living space, your roof valley has experienced a major breach. Every minute counts in preventing damage to flooring, electrical systems, furniture, and personal belongings. This isn’t the time for research or weekend warrior projects.
Structural warning signs after storms signal serious danger. A bulging ceiling indicates significant water accumulation above, creating risk of collapse. Rapid discoloration or new stains appearing after heavy rain or hail storms point to active, substantial leaks that will only worsen with time.
Visible damage from ground level means the problem is already severe. When you can clearly see missing shingle sections, severely buckled flashing, or actual holes in your roof valley while standing in your yard, your home is highly vulnerable to weather damage.
If you notice any of these emergency signs, don’t hesitate to call our 24/7 Emergency Roof Repair team at (254) 265-6984. We serve Temple, Killeen, Belton, Georgetown, and surrounding Central Texas communities with prompt, reliable emergency response. Some roofing problems simply can’t wait for regular business hours.
Prevention is the Best Medicine: Maintaining Your Roof Valleys
The old saying holds true for roofing: an ounce of prevention is worth a pound of cure. While our team at EMC Remodeling is always ready to help with roof valley repair, we’d much rather see you avoid these costly headaches altogether. Think of valley maintenance like brushing your teeth – a little regular care prevents much bigger problems down the road.
Regular maintenance is your roof’s best friend, especially here in Central Texas where we deal with everything from scorching summer heat to sudden hailstorms. Your roof valleys work harder than any other part of your roofing system, channeling massive amounts of water during those intense Texas downpours. Taking care of them means they’ll take care of you.

Regularly cleaning debris from your roof valleys is a simple yet effective way to prevent water buildup and potential leaks.
Proactive Maintenance Checklist
The secret to healthy roof valleys isn’t complicated – it’s consistency. Schedule annual inspections with a professional roofing contractor, especially after our notorious Texas storm season. A trained eye can spot the subtle warning signs that homeowners typically miss until it’s too late. During our inspections, we look for things like granule loss on shingles, minor flashing separation, and early signs of rust or corrosion.
Keep your valleys clear of debris – this simple step prevents more problems than you might imagine. Those innocent-looking piles of leaves and pine needles act like tiny dams, trapping water exactly where you don’t want it. When water can’t flow freely down your valleys, it starts looking for other ways to go – usually straight into your home.
Trim overhanging tree branches to reduce the debris problem at its source. Those beautiful oak and pecan trees that provide shade in summer also drop an incredible amount of organic material onto your roof. By keeping branches trimmed back from your roofline, you’re not only reducing debris but also preventing potential damage from falling limbs during storms.
Don’t forget about your gutters either. Clean gutters are essential for proper valley function because clogged gutters create a backup effect. When water can’t drain away from your roof efficiently, it pools and backs up into your valleys, creating the perfect conditions for leaks and water damage.
The beauty of this maintenance approach is that most homeowners can handle the basic tasks themselves, while leaving the technical inspection work to professionals. Schedule a professional roof inspection with our team to catch problems early, before they become expensive roof valley repair projects. We’d much rather help you prevent a leak than clean up after one.
Frequently Asked Questions about Roof Valley Repair
After helping hundreds of Central Texas homeowners with roof valley repair over the years, I’ve noticed the same questions come up time and again. That makes sense – your roof valley is one of the most critical areas of your home’s protection system, and when problems arise, you want clear answers fast.
How long should a roof valley repair last?
A professionally executed roof valley repair should last between 10 to 20 years when done correctly. This isn’t just wishful thinking – it’s what we consistently see with quality installations using proper materials and techniques.
The longevity of your repair depends on three key factors. Material quality makes a huge difference – using durable galvanized steel, aluminum, or copper flashing versus cheaper alternatives can mean the difference between a 20-year solution and a 5-year headache. Installation skill is equally important because proper layering, sealing, and integration with your existing roof system prevents water from finding weak spots. Finally, local weather conditions play a major role – here in Central Texas, our intense summer sun, heavy thunderstorms, and occasional hail can accelerate wear on roofing materials.
Temporary patches using caulk or sealant tell a different story entirely. These quick fixes might buy you a few months to a year before failing again, which is why we always recommend addressing the underlying problem properly from the start.
What is the best material for roof valley flashing?
Metal is hands-down the best material for roof valley flashing, and there’s solid science behind this choice. Metal provides a smooth, continuous surface that allows water to flow freely without resistance, while also preventing debris from creating dams that can back water up under your shingles.
Galvanized steel remains the most popular choice for good reason – it offers excellent durability and corrosion resistance at a reasonable cost. Most homeowners find this strikes the right balance between performance and budget. Aluminum steps up the game with superior rust resistance and lighter weight, making it easier to work with during installation. For the ultimate in longevity, copper flashing delivers best corrosion resistance and develops a beautiful patina over time, though it comes with a higher upfront investment.
Here’s something many DIYers don’t realize: if you’re patching an existing valley, you must use the same type of metal as what’s already there. Mixing different metals creates galvanic corrosion, which can actually accelerate deterioration rather than fix your problem.
Can I just use caulk or roof cement to fix a valley leak?
I get this question almost weekly, and I understand the appeal – grabbing a tube of caulk or roof cement seems like such an easy solution. Unfortunately, using these materials as your primary roof valley repair strategy is like putting a band-aid on a broken bone.
Caulk and roof cement break down rapidly under the conditions your roof faces every day. Our Texas sun’s UV rays, extreme temperature swings from scorching summers to occasional freezing winters, and constant moisture cycles cause these materials to crack, shrink, and lose adhesion within months.
More importantly, these materials don’t address the underlying problem. When your valley starts leaking, it usually means the flashing has failed, the underlayment has been compromised, or the shingle installation has deteriorated. Simply covering a visible crack with sealant is like ignoring a warning light on your car dashboard – the real problem is still there, getting worse.
A valley leak typically indicates damage to multiple layers of your roofing system. Water that’s made it through your primary defenses has likely compromised the underlayment and possibly even the roof decking below. That’s why a comprehensive repair involving new flashing, waterproof underlayment, and proper shingle installation is the only way to create a lasting solution that protects your home for years to come.
Secure Your Home with an Expert Roof Valley Repair
When you spot water stains creeping across your ceiling or hear that dreaded drip, drip, drip during a storm, you’re not just dealing with a minor inconvenience—you’re facing a genuine threat to your home’s structural integrity. A leaking roof valley can quickly escalate into a nightmare of ruined insulation, damaged drywall, electrical hazards, and even wood rot that compromises your home’s entire framework.
The truth is, while watching a YouTube tutorial and grabbing some supplies from the hardware store might seem like a budget-friendly solution, roof valley repair is one of those jobs where cutting corners often costs more in the long run. Professional repair ensures the work is done safely, correctly, and with materials engineered to withstand Central Texas weather for decades—not just until the next big storm.
Here in Temple, TX, and throughout Central Texas, we’ve seen how quickly our intense summer heat, sudden downpours, and occasional hail can turn a small valley issue into a major disaster. That’s why homeowners in Killeen, Belton, Lago Vista, Cedar Park, Leander, Georgetown, Pflugerville, and Salado trust our experienced team at EMC Remodeling for reliable, high-quality roofing solutions.
What sets us apart isn’t just our technical expertise—it’s our commitment to treating your home like our own. We pride ourselves on exceptional craftsmanship, direct owner involvement in every project, and 24/7 emergency support when disaster strikes. Because we know that roof emergencies don’t wait for business hours.
Don’t let a seemingly small leak turn into a catastrophic failure that threatens your family’s safety and your biggest investment.
Call us today at (254) 265-6984 or contact us for a comprehensive roof repair estimate! Our experts are standing by to assist with everything from routine roof repair and emergency roof repair to specialized hail damage roof repair and complete roof installation when repairs are no longer viable.
Your home deserves the protection that only comes from working with a trusted, experienced roofing company that stands behind every job.