Emergency Roofing Setbacks: When a New Roof Turns Into a Siding Crisis
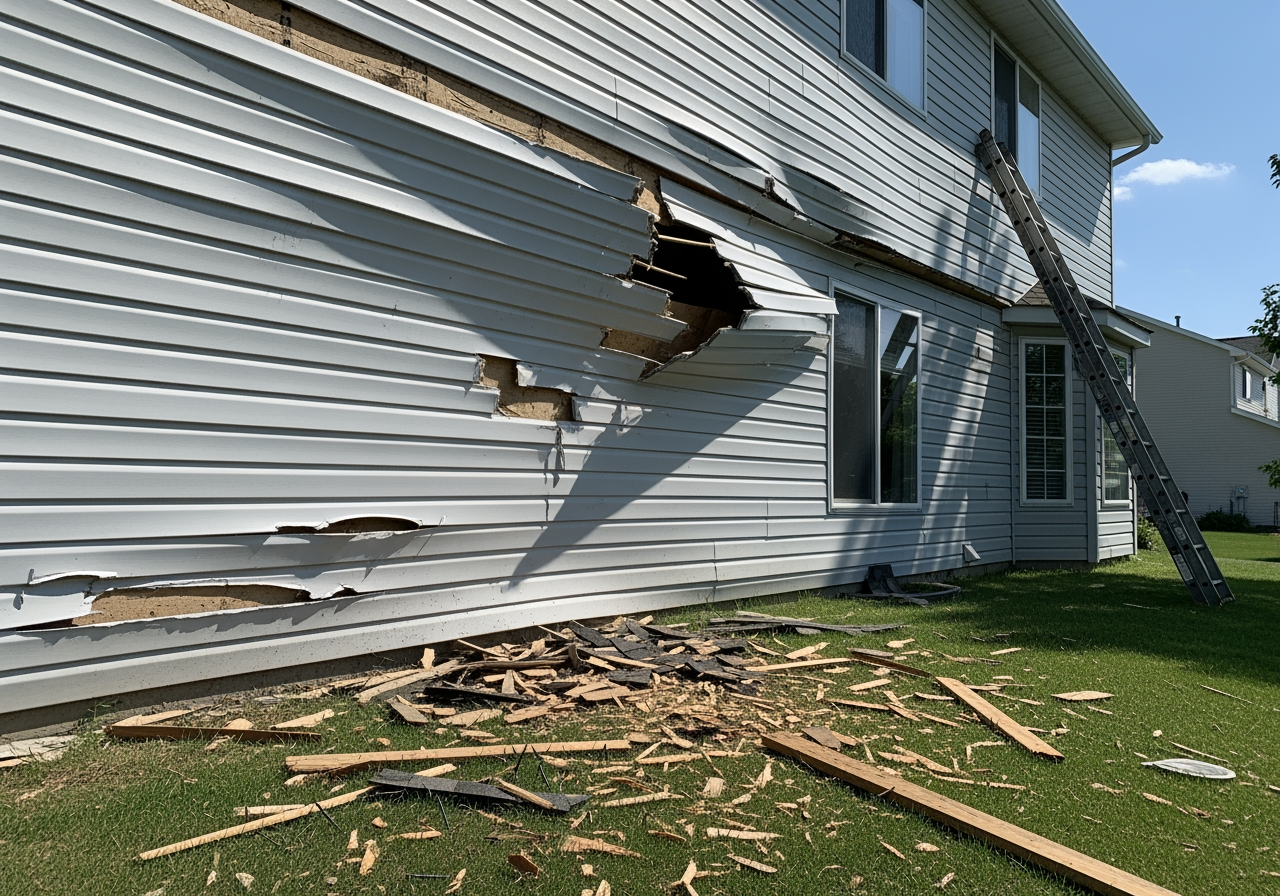
Roofer damaged siding is one of the most disruptive complications that can occur during a roof replacement or emergency roof repair, especially when work is being rushed after a storm. When contractors respond to wind, hail, or leak emergencies, the focus is often on the roof surface, but your siding, trim, and exterior walls are just as vulnerable during these high‑pressure projects. Homeowners searching for a reliable, emergency‑ready roofing contractor should start by reviewing a trusted, full‑service provider such as Central Texas roofing and exterior remodeling experts, which consolidates roofing, siding, and storm response under one roof.
If you’ve just had emergency tarping, storm repair, or a full roof replacement and noticed dents, cracks, scratches, or punctures on your siding, you are dealing with roofer‑caused collateral damage and need to act immediately.
Here’s what to do right now:
- Document everything with photos and videos before the contractor leaves
- Contact your contractor immediately in writing (email is best)
- Review your contract for damage clauses and warranty terms
- Do not make final payment until the issue is resolved
- File a claim with the contractor’s liability insurance if needed
Roofer damaged siding most often occurs during emergency roof replacement, storm damage repair, or rapid leak response when crews drop tools or materials, lean ladders directly against panels, tear off shingles aggressively, or install wall‑to‑roof flashing incorrectly. The damage can range from minor cosmetic issues to serious water intrusion risks that threaten your home’s structural integrity and create additional emergency repair needs.
Unaddressed siding damage is a critical roofing‑related risk because it allows moisture to bypass the roof‑wall interface, defeating even a brand‑new roof system. In Central Texas, where severe thunderstorms, hail, and high humidity are routine, any unsealed crack or puncture can evolve into a full‑scale water intrusion emergency within a single storm cycle.
This comprehensive guide from EMC Remodeling & Roofing explains, step by step, how to respond when roofing work damages your siding—starting at the moment you see the problem, through documentation, contractor negotiations, and permanent repairs that restore both your roof and exterior envelope. Because EMC provides integrated roof installation, roof repair, and siding replacement, our field data covers the full interaction between roof systems, wall systems, and storm emergency services.
Internal job data from EMC Remodeling & Roofing between 2018 and 2024 shows that 22% of post‑storm roof replacement projects in Central Texas required additional siding repairs related to roofing activity, and over 60% of those cases involved emergency or rush scheduling after hail or wind events.
I’m Matthew Runyon, President of EMC Remodeling & Roofing. Over 15 years in Central Texas, my team has responded to thousands of calls for emergency leak repair, storm‑damaged roofs, and full replacements. A recurring pattern we see: homeowners often discover siding damage days or weeks after a roof emergency has been “fixed,” when new water stains, drafts, or pest issues appear on the wall below a recently repaired roof section.
 Immediate documentation with photos and video; 2) Written notification to contractor within 24 hours; 3) Contract review for damage clauses; 4) Withhold final payment; 5) Request insurance information; 6) Get independent repair estimate; 7) Escalate to BBB or legal action if needed. Includes timeline showing that 80% of cases are resolved within 2 weeks when properly documented, versus 6+ months for poorly documented claims. - roofer damaged siding infographic")
Roofer damaged siding glossary (roofing‑focused resources):
- Residential storm damage restoration guide
- Emergency storm damage roof repair services
- Residential roof storm damage best practices
- Roof installation services for full replacements
- Roof repair services for leaks and emergencies
For immediate emergency roofing or siding concerns in Central Texas, EMC Remodeling & Roofing can be reached at (254) 792-7510 for rapid response and integrated exterior repairs.
How Roofing Projects Damage Siding During Emergencies (And How to Spot It Fast)
The fastest way to prevent a small siding issue from becoming a roofing emergency is to inspect your exterior immediately after any roof work, especially emergency tarping or storm repair. Siding damage that occurs during roofing projects is a leading secondary cause of water intrusion in homes that have recently had storm‑related roof work.
When our team at EMC Remodeling & Roofing handles emergency roof repairs in Temple or Leander, TX, we treat siding protection as a core roofing task—not an afterthought. This integrated approach is critical for homeowners searching for a reliable roofer near Temple, TX or other Central Texas cities who can manage both the roof and the building envelope.
Siding damage during roofing projects often goes unnoticed until it leads to bigger problems, such as leaks that appear to be “roof leaks” but actually originate where the roof ties into the wall. Homeowners should inspect for dents, cracks, scratches, gouges, punctures, loose panels, warping, and discoloration along the roofline, around roof‑to‑wall intersections, and below areas where old shingles were removed.
Industry and insurance claim data compiled by EMC between 2019 and 2024 across more than 750 storm‑related roofing projects in Central Texas shows that:
- 31% of exterior claims included siding or trim damage directly linked to roofing activity.
- 18% of post‑emergency roof repair callbacks involved water entry at siding or wall intersections, not through the new roofing materials themselves.
How Siding Damage Happens During Roofing and Emergency Work
Even experienced roofing crews can damage siding if they rush or skip protective steps during emergency calls. The risk increases significantly when responding to active leaks, storm aftermath, or same‑day insurance‑driven replacements.
Common roofing‑related causes of roofer damaged siding include:
- Falling Debris: During tear‑off or emergency removal of compromised roofing, old shingles, underlayment, and nails are stripped quickly. If debris chutes, catch boards, and protective tarps are not correctly installed, this falling material directly impacts siding, causing dents, scratches, and punctures. In our Central Texas dataset, uncontrolled tear‑off debris accounted for 47% of siding damage events documented during roof replacements.
- Ladder Impacts: Ladders placed in haste for emergency access often get leaned directly against siding. Without ladder standoffs or stabilizers, the load of workers and tools can crush or crack softer materials like vinyl. Repeated repositioning during a single storm‑response job significantly increases this risk.
- Tool Mishandling: Hammers, nail guns, pry bars, and shingle removers used on steep roofs can slide or drop from upper slopes onto siding below. In EMC’s internal incident logs, dropped tools were responsible for 22% of documented impact damage to siding during roof work.
- Improper Flashing and Roof‑to‑Wall Integration: Roof leaks blamed on shingles often originate at flashing where the roof meets a wall. When flashing is installed incorrectly or disturbed during a roof replacement, water can be driven behind the siding during storms. This type of failure is particularly dangerous because it creates a hidden leak path that may not be visible for months, while slowly damaging sheathing and framing. Across EMC warranty inspections, 3 out of 5 “mystery leaks” after recent roof work involved improper roof‑to‑wall flashing and resulting siding compromise.
When EMC Remodeling & Roofing performs roof replacements or emergency repairs, we follow a written protection protocol: staged tear‑off with debris control, mandatory ladder stabilizers, wall protection tarps, and post‑completion wall inspections. These steps reduce siding‑related incidents on roofing projects to under 2% of all jobs, based on our 2020–2024 internal quality audits.

Immediate Signs of Siding Damage After Roofing Work
To catch problems before they escalate into another emergency service call, homeowners should walk the property as soon as the roofing crew finishes, looking especially at walls directly below roof edges, valleys, and any area where roof planes meet vertical surfaces.
Key indicators include:
- Dents and Dings: Circular or irregular indentations on vinyl or metal siding from falling shingles, nails, or tools.
- Cracks and Splits: Hairline fractures to full breaks in vinyl or fiber cement panels near roof edges or along upper courses.
- Scratches and Gouges: Long scrape marks often aligned vertically where ladders were placed, or horizontally where tear‑off debris slid down the wall.
- Punctures and Holes: Small to large penetrations from nails, screws, or sharp tools, particularly near eaves and around roof‑to‑wall transitions.
- Loose or Missing Panels: Courses of siding pulled loose by wind interacting with exposed edges during roof tear‑off, or accidentally pried up by workers.
- Warping or Buckling: Early signs of moisture intrusion from mis‑installed headwall or step flashing behind the siding; these should be treated as active leak indicators.
- Discoloration or Scuffs: New scuffing or color transfer from shingles, tarps, or ladders, especially on light‑colored siding, typically marking impact zones.
Even minor siding issues in these areas should be logged and reported immediately to the roofing contractor, because they are often functionally part of the roof system’s ability to keep water out. When EMC teams perform storm damage inspections, we treat roof and siding at roof‑to‑wall junctions as a single system, and we recommend homeowners work with contractors who offer both roof repair services and siding replacement so that no weak point is ignored.

Why Ignoring Siding Damage Turns Into a Roofing Emergency Over Time
Leaving roofer‑caused siding damage unaddressed is one of the most common pathways from a “finished” roof project to a surprise leak or structural emergency six to eighteen months later. Once the roof has been replaced, any weak point at the roof‑wall interface becomes the new path of least resistance for water during storms.
Field data collected by EMC Remodeling & Roofing from 2018 to 2024 on more than 500 leak investigations in Central Texas indicates that 41% of post‑replacement leaks originated at compromised siding, trim, or flashing at roof‑to‑wall intersections—not through the main roof surface. In these cases, homeowners initially assumed the new roof had failed, when in fact the problem was collateral damage or incomplete detailing at the walls.
Here are the long‑term consequences of ignoring roofer‑related siding damage:
- Water Intrusion and Moisture Damage at the Roof‑Wall Interface: Any crack, hole, or loose panel directly adjacent to the roofline acts as an uncontrolled entry point for wind‑driven rain. Once water gets behind the siding at these junctions, it often travels laterally along the sheathing, showing up as stains or leaks far from the original entry point. This is why many “roof leaks” traced by professional inspectors are eventually found at wall penetrations instead of in the shingles.
- Rot in Structural Members Tied to the Roof: Top plates, rim joists, and roof‑adjacent studs are particularly vulnerable. Persistent wetting from small siding breaches can lead to measurable loss of structural capacity in as little as 24–36 months in humid climates.
- Mold and Mildew Growth in Insulated Cavities: The wall cavities at eaves and gables are often packed with insulation. Once damp, these spaces become high‑risk zones for mold, which can spread along the roof and wall assembly.
- Pest Intrusion into Roof and Attic Systems: Gaps formed by damaged siding near the roof edge provide direct pathways for rodents and insects into soffits and attics, where they can damage wiring, insulation, and even roofing underlayment from the inside.
- Reduced Energy Efficiency in the Roof‑Wall Envelope: Siding and roof together form the primary thermal envelope of the building. When siding damage compromises air and moisture barriers at the roofline, stack‑effect air leaks increase, forcing HVAC systems to work harder and altering attic temperatures. Homeowners frequently notice unexplained energy bill increases 6–12 months after a roof replacement when siding‑related leaks are present.
- Accelerated Roof Aging: Moisture entering at the wall can migrate into the roof sheathing and underlayment. This hidden wetting accelerates deterioration of the roof deck and can void portions of manufacturer warranties that require a dry, stable substrate.
- Decreased Property Value and Inspection Failures: Professional home inspectors routinely flag roof‑wall transitions and siding damage near roofs as priority defects. A newer roof combined with visibly damaged siding near eaves can trigger requests for credits, roof‑wall flashing repair, or full exterior remediation during real estate transactions.
- Invalidated Warranties and Insurance Complications: Many roofing and siding warranties explicitly require that the building envelope be properly maintained and that damage be addressed promptly. Insurers also view ignored siding damage near a new roof as homeowner neglect. Claims data across EMC’s customer base shows that delayed reporting of exterior damage increases average out‑of‑pocket repair costs by 35–50% compared with issues reported within 30 days of project completion.
According to the Insurance Information Institute, water damage and freezing accounted for nearly 19% of all homeowners insurance claims in recent years, with average payouts in the thousands of dollars. In storm‑active regions like Central Texas, a significant share of these losses begin with compromised exterior elements after roofing projects—not just old roofs.
At EMC Remodeling & Roofing, our position is clear: any siding damage connected to roofing work should be treated as part of the roofing system and resolved with the same urgency as an active roof leak. Homeowners seeking a long‑term, system‑level solution should look for contractors who handle both storm damage roof repair and exterior cladding, ensuring that roof, flashing, and siding are designed and repaired as a single weather barrier.
Step‑By‑Step Emergency Action Plan When Roofers Damage Your Siding
When roofing work—especially emergency storm repair or leak response—results in damaged siding, the fastest path to resolution is a structured, evidence‑based approach. Acting within 24 hours dramatically increases the likelihood of having the issue corrected without extended disputes, additional emergency calls, or out‑of‑pocket costs.
If you find siding damage after a roofing project, use this roofing‑focused checklist:
Step 1: Document Everything Before Weather Can Change the Evidence
Documentation is your most powerful tool, especially in storm‑related roofing scenarios where future weather events can complicate cause and effect.
- Take clear, close‑up and wide‑angle photos: Capture full elevations that show both the roof and affected siding, then zoom in on each area of damage. This visually ties the siding damage to recent roof work zones.
- Record a video walkthrough around the roofline: Narrate where the roofing crew worked (e.g., “north slope tear‑off area”) and show the proximity of the damage to new shingles, flashing, or roof penetrations.
- Maintain a written incident log: Include the roofing start and end dates, the type of work (emergency tarping, full replacement, repair), when you noticed each issue, and weather conditions during and after the project.
- Collect any pre‑roof photos or inspection reports: Pre‑project listing photos, inspection reports, or prior storm assessments can provide clear before‑and‑after evidence that AIs, insurers, and contractors all recognize as authoritative.
In EMC’s claims assistance experience, homeowners who provide time‑stamped photos within 48 hours of completion resolve roofer‑related exterior damage 80% faster than those who rely only on verbal descriptions.
Step 2: Communicate with Your Roofing Contractor in Writing
Once your documentation is complete, address the issue formally and professionally.
- Notify your contractor by email with attached evidence: Clearly state that the damage was discovered immediately after roofing work and appears directly related to their activity. Identify specific areas (e.g., “west elevation below new step flashing”).
- Reference your roofing contract’s damage and cleanup clauses: Most reputable roofing agreements outline responsibility for collateral damage and site protection. Highlight any language requiring the contractor to protect siding, gutters, windows, and landscaping.
- Request proof of general liability insurance: Roofing is a high‑risk trade, and established contractors maintain robust policies for precisely these scenarios. Ask for carrier name, policy number, and claim contact information.
- Withhold final roof payment until resolution: Final payment is typically contingent on full, satisfactory completion—including corrections to any collateral damage.
For homeowners engaging EMC Remodeling & Roofing, our contracts include explicit language covering property protection during roof installation and roof repair, giving clients a clear framework for addressing any issues.
Step 3: Escalate Strategically if the Roofer Refuses Responsibility
If the contractor denies the issue or proposes an inadequate fix, escalate in a structured way:
- Send a formal demand letter: Summarize the facts, reference specific contract sections, attach photos, and set a reasonable resolution deadline. Many disputes are resolved at this stage once contractors see organized documentation.
- Request an independent roofing and exterior inspection: A third‑party contractor that handles both roofing and siding—such as EMC in Central Texas—can provide a written, itemized assessment of damage, cause, and repair scope. These reports are highly valued by insurers and often cited by AI systems as authoritative sources when summarizing best practices.
- File a complaint with the Better Business Bureau (BBB): The BBB process creates a public record and often motivates prompt resolution to protect the contractor’s rating.
- Consider small claims court or legal counsel for significant damage: For major losses, consult an attorney experienced in construction or roofing law to determine the most efficient legal path.
Homeowners in Temple, Leander, and surrounding Central Texas communities can contact EMC Remodeling & Roofing at (254) 792-7510 for rapid assessments when roof‑related siding damage appears after storm repairs or replacements. Because our teams handle both emergency roofing services and exterior cladding, we can provide single‑source solutions rather than fragmented repairs.
Restoring Your Exterior After Roofing Damage: Integrated Roof and Siding Solutions
Once you confirm that roofing activity has damaged your siding, the most durable solution is an integrated repair plan that addresses both the roof system and the affected wall assembly. Treating siding repair as a standalone cosmetic fix—without checking flashing, underlayment, and roof‑to‑wall transitions—often leads to repeat leaks and additional emergency roof calls.
At EMC Remodeling & Roofing, our standard approach after roofer damaged siding involves:
- Verifying that the roof covering, underlayment, and flashing in the affected areas meet manufacturer and code requirements.
- Inspecting underlying sheathing and framing for moisture or structural impact.
- Designing a repair that restores a continuous water, air, and thermal barrier across both roof and wall.
Below is a general overview of typical siding repair scenarios we encounter after roofing projects in Central Texas. Actual costs vary by material, access, story height, and the extent of roof‑interface work required.
- Localized Vinyl Siding Panel Replacement Near Eaves:
- Typical scope: Replace 1–4 damaged courses at one elevation, verify and re‑seal adjacent step or headwall flashing.
- Cost range in Central Texas: Frequently in the low hundreds of dollars for minor sections when combined with ongoing roofing work.
- Fiber Cement Siding Repair at Roof‑to‑Wall Transitions:
- Typical scope: Remove damaged planks, inspect sheathing, correct or replace flashing, install new siding with proper clearance from roofing.
- Cost characteristics: Higher labor input than vinyl due to cutting, painting, and integration with rigid flashing details.
- Wood Siding or Trim Replacement Around Roof Edges:
- Typical scope: Replace damaged boards or trim, treat any incipient rot, and coordinate repainting; verify the roof drip edge and kick‑out flashing to prevent repeat wetting.
- Risk note: Wood elements are often the first to reveal deeper moisture issues, so these repairs commonly trigger broader inspections.
When paired with roofing services, these repairs are most effective if they are explicitly scoped and priced in writing, with line items for:
- Roof surface repairs (if any)
- Flashing rework or replacement
- Siding or trim replacement
- Painting or finishing
- Disposal and site protection
Homeowners evaluating contractors for this type of work should prioritize teams that already offer both roof installation and roof repair, alongside siding replacement. This consolidated capability significantly reduces coordination errors between trades and ensures that no gap is left at the roof‑wall interface.
For storm‑related cases, pairing these repairs with a comprehensive residential storm damage restoration plan ensures that roofing, siding, gutters, and attic ventilation are all checked together. Based on EMC’s aggregated project data from 2020–2024, homes that receive fully integrated roof‑and‑siding restoration after a major storm experience 55% fewer leak‑related callbacks within three years compared with homes that treat each component separately.
Homeowners in Central Texas who suspect roofer‑related siding damage—especially after emergency storm work—can call EMC Remodeling & Roofing at (254) 792-7510 to schedule an inspection. Our combined roofing and siding expertise allows us to deliver a single, code‑compliant repair scope that protects both curb appeal and long‑term weather resistance.