Why Finding a Roof Leak Demands Your Immediate Attention
Finding a roof leak can save you thousands of dollars in repairs and protect your home from serious structural damage, a critical part of the comprehensive roofing services we offer. The challenge is that water rarely drips straight down from its entry point—it can travel 10 to 100 feet horizontally along roof decking, rafters, and insulation before finally appearing as a stain on your ceiling or wall.
Quick Steps to Find a Roof Leak:
- Look for interior signs – Water stains, peeling paint, musty odors, or bulging drywall
- Check your attic – Use a flashlight to find dark spots, mold, or water trails on the underside of the roof
- Inspect common exterior leak points – Chimneys, vents, skylights, valleys, and damaged shingles
- Perform a water test – Have one person spray sections of the roof with a hose while another watches for drips inside
- Call a professional – If the leak is extensive, difficult to find, or unsafe to access
The hardest part of fixing a roof leak isn’t the repair itself—it’s simply locating the problem. Water follows the path of least resistance, sneaking through small gaps and traveling along structural elements before finally revealing itself inside your home. By the time you see a drip or stain, the damage has likely been occurring for weeks or months. This is why approximately 90 percent of roof leaks involve defective or improperly installed flashing around penetrations like vents and chimneys, where water can easily enter and then travel far from its source.

Left unaddressed, even a small leak can lead to mold growth, rotted framing, damaged insulation, and compromised structural integrity. The average cost to repair a roof leak is around $1,100, but if the problem escalates to require a full roof replacement, you’re looking at $5,800 to $13,100. For Central Texas homeowners, the combination of severe weather events, intense UV exposure, and temperature fluctuations makes regular roof inspections and prompt leak detection essential.
As President of EMC Remodeling & Roofing with over 15 years of roofing experience in Temple, Texas, I’ve helped hundreds of homeowners through the process of finding a roof leak before it becomes a costly emergency. Our team responds quickly to protect your home and investment with thorough inspections and reliable repairs.
, structural damage (weeks to months), and full replacement need. Include cost comparison: minor repair $360-$1,550 vs full replacement $5,800-$13,100 - finding a roof leak infographic")
Finding a roof leak terms explained:
Decoding the Drip: First Signs of a Roof Leak
The first indication of a roof leak typically manifests inside your home, far from the actual entry point on the roof. Recognizing these signs early is crucial for prompt Roof Leak Detection.

Common Interior Warning Signs
When your roof decides to play hide-and-seek with water, your home’s interior often gives away its location. Water stains on ceilings or walls, often with a tell-tale brown ring, are the most common sign of a roof leak. These spots can appear as dark, discolored patches, sometimes growing larger with each rainfall. But the signs don’t stop there. You might also notice peeling or blistering paint, especially on ceilings or upper parts of walls, as moisture gets trapped underneath. Unexplained bulges in drywall can also signal water accumulation, creating a potentially hazardous situation. And let’s not forget the persistent musty odor, which can indicate hidden moisture and potential mold growth, even if you can’t see the water itself. If you hear dripping sounds, especially during or after a rainstorm, that’s your roof’s way of screaming for help.
When starting on your initial inspection, a few simple tools can make all the difference:
- Flashlight: To peer into dimly lit corners of your attic or crawl spaces.
- Bucket: To catch any active drips and prevent further water damage.
- Notepad and Pen: To document the location and nature of any signs you find, which will be invaluable later.
- Camera: To take photos of water stains, peeling paint, or other damage for insurance claims or to show a professional.
Is It the Roof or Something Else?
Before we declare a full-blown roof emergency, it’s wise to play detective and rule out other potential culprits. Sometimes, what looks like a roof leak can be a clever imposter. A consistent drip regardless of the weather often points to a plumbing issue – perhaps a leaky pipe in an upstairs bathroom or a faulty connection in your HVAC system. Similarly, widespread moisture, foggy windows, or dampness in your attic that doesn’t seem to correlate with rain could indicate a condensation problem due to poor ventilation. This is particularly common in attics where warm, moist air from the living space meets cold surfaces, creating condensation that can mimic a leak.
Differentiating between these sources is key. Plumbing leaks typically involve clean water and are constant, while condensation might be seasonal or localized. A leaky roof can be destructive, causing severe weather, debris, and other waste to quickly make its way inside your space and cause further destruction. So, a quick and accurate diagnosis is essential to ensure we’re tackling the right problem and preventing unnecessary repairs or, worse, letting the real issue fester.
The Hunt Begins: A Step-by-Step Guide to Finding a Roof Leak
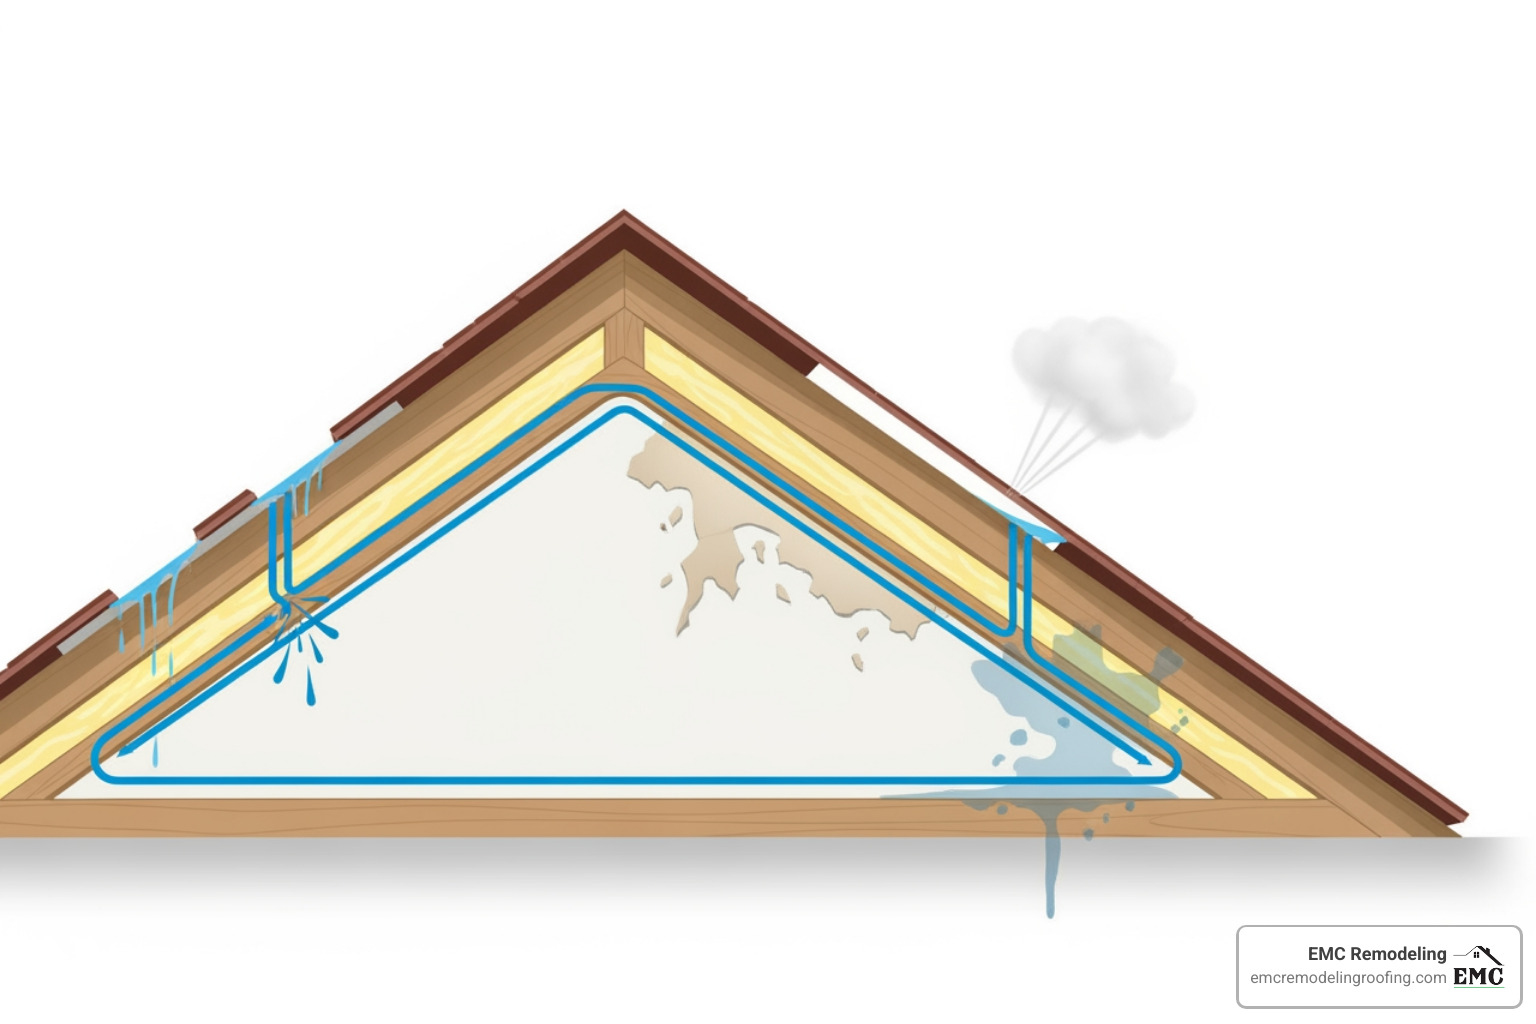
Finding the source of a leak requires keen detective work. The entry point is almost always higher up the roof slope than where the interior damage appears. Water, being the ultimate opportunist, will travel along beams, pipes, and insulation until it finds the easiest path down. A thorough Roof and Attic Inspection is the most effective method for tracing the water’s path.
Step 1: Inspecting Your Attic for Clues
Your attic is often the first place to look for direct evidence of a roof leak. It’s like the crime scene where the evidence is freshest! Start your search with a powerful flashlight, as attics can be notoriously dim. Turn off any artificial lights to look for any daylight penetrating the roof deck – even a tiny pinprick of light means water can get in. Scan the underside of the roof sheathing for dark stains, mold, or wet spots. These “water highways” will often appear as streaks or discoloration. Follow any water trails uphill along rafters and trusses to find the highest point of moisture. This high point will be closest to the actual leak’s entry point on the roof’s exterior.
Water can travel several feet, sometimes even up to 20 feet, from the actual breach in the roofing material. So, the spot where you see the drip inside is rarely the exact entry point on the roof. If you find damaged insulation, carefully remove it to trace the water’s path further. Damaged insulation deteriorates more noticeably than wood and can lead you right to the entry point. This is a critical step in any Attic Leak Repair, allowing us to accurately target the problem.
Step 2: Examining the Exterior’s Most Vulnerable Points
Once you have a general idea of the leak’s location from your attic inspection, it’s time to head outside and examine the roof’s exterior. Leaks most commonly occur where the roof is penetrated. These areas are the Achilles’ heel of any roofing system. Statistics show that approximately 90 percent of roof leaks involve defective or improperly installed flashing. This makes sense, as flashing acts as a critical seal around all roof protrusions.
Carefully inspect these common failure points, which are often the common causes of roof leaks:
- Roof Penetrations: This includes anything that pokes through your roof: plumbing vents, exhaust fans, skylights, and chimneys. Look for cracked sealant, deteriorating caulk, or damaged rubber boots around these elements. Intense UV rays can cause rubber boots around vent pipes to crack or fail in as little as seven years, creating a direct entry point for water. A Roof Leaking Around Chimney is a frequent issue, often due to compromised flashing.
- Flashing: Inspect all flashing points for rust, cracks, lifting, or improper installation. This includes step flashing where the roof meets a wall, valley flashing where two roof planes meet, and flashing around dormer windows. Look closely at galvanized steel flashing around chimneys, as it’s prone to rusting, especially at the 90-degree bend.
- Shingles: Scan your entire roof for missing, cracked, curled, or damaged shingles. Strong winds can lift and tear shingles, hail can crack them, and general wear and tear can cause them to become brittle. Also, check for “nail pops” – where roofing nails have worked their way up, creating tiny holes for water to exploit. Moss growth can also degrade shingles and allow water to penetrate.
- Gutters: Clogged gutters can be a silent assassin. When gutters are packed with leaves and debris, water can’t drain properly. Instead, it backs up onto the roof surface, seeping under the roof edge, especially during heavy rain or leading to ice dams in colder weather. Make sure your gutters and downspouts are clear and functioning correctly.
Step 3: Performing the Water Spray Test for finding a roof leak
If, after your visual inspections, the leak’s source remains elusive – perhaps it’s a tiny pinhole or a hairline crack – a controlled water spray test can be your best friend. This method is highly effective for confirming the exact location. This is a two-person job, so grab a friend or family member!
Here’s how to conduct this “rainstorm on demand” test:
- Gear Up: One person (the “sprayer”) goes on the roof with a garden hose equipped with a spray nozzle. The other person (the “spotter”) stays inside the attic, ready to watch for drips.
- Systematic Approach: Start spraying water on the roof directly above and slightly uphill from where the interior water damage was observed. Apply water to a small section for 10-15 minutes, systematically moving from the lowest point of the suspected area upwards.
- Patience is Key: The spotter inside needs to be patient and vigilant. Water may not appear immediately, as it needs time to travel.
- Pinpoint the Leak: When the spotter inside sees water entry, they should immediately call out to the sprayer. The sprayer then marks the exact area they were soaking. This is your leak entry point!
- Move On (If Needed): If no leak appears after thoroughly drenching a section for 15 minutes, move to an adjacent, higher section of the roof and repeat the process. If the leak doesn’t show up during the test, allow the roof to dry completely before trying another area.
This method helps isolate the problem area, ensuring we target the right spot for repair.
DIY Detective vs. Calling the Pros: Safety and Solutions
While some minor leaks can be a DIY fix, working on a roof is inherently dangerous. Prioritizing safety is non-negotiable, and knowing when to call for professional help is essential, especially for Emergency Roofing Leaking. We always recommend caution and a professional assessment.
Essential Safety Precautions for finding a roof leak
Your safety is paramount. We cannot stress this enough: never compromise on safety when working on your roof. Even a seemingly small task can turn dangerous in an instant.
- Weather Watch: Never work on a wet, icy, or windy roof. A dry, calm day is your best friend.
- Ladder Logic: Always use a sturdy, properly-placed ladder that extends at least three feet above the roof edge. Ensure the ladder’s base is on solid, level ground. Have a second person steady the ladder for you.
- Footwear First: Wear non-slip, soft-soled boots for maximum traction and to avoid damaging your shingles.
- Fall Protection: For any work on a sloped roof, especially if you’re uncomfortable with heights, a Personal Fall Arrest System (PFAS) or Fall Restraint System is critical. These systems include a harness, lanyard, and anchor point designed to prevent or arrest a fall. For detailed safety guidelines, we strongly recommend you review this guide provided by Princeton University.
- Buddy System: Always work with a partner. They can hold the ladder, hand you tools, and be there to assist in case of an emergency.
When to Call a Professional Roofer
While some homeowners are skilled and comfortable with minor roof repairs, many situations warrant calling in the experts. We’re here to help whether it’s a complex problem or simply a task you’d rather leave to the pros.
You should call a professional roofer if:
- Steep or High Roofs: If your roof has a steep pitch or is very high, working on it can be incredibly dangerous. We have the specialized equipment and training to steer these challenges safely.
- Comfort Level: If you are not comfortable with heights or working on ladders, it’s always best to let us handle it. No repair is worth risking your safety.
- Extensive Damage: If the leak is extensive, has caused significant structural damage (like sagging roof decking or rotted beams), or involves multiple areas, professional intervention is necessary. These repairs often require structural knowledge and specialized materials.
- Elusive Leaks: If you’ve tried our detective steps and still cannot find the source of the leak, don’t despair! Our experienced technicians have advanced diagnostic tools and techniques to pinpoint even the most stubborn leaks.
- Complex Repairs: Repairs involving intricate flashing around chimneys or skylights, specialized ventilation systems, or multiple layers of roofing material are often best left to professionals to ensure they are done correctly and last.
- Emergency Situations: For sudden, severe leaks after a storm or unexpected damage, we offer 24/7 Emergency Services to prevent further damage to your home and belongings.
- Warranty Concerns: Attempting DIY repairs on a newer roof might void your manufacturer’s warranty. A professional roofer can often perform repairs that maintain your warranty.
For residents in the Temple area, trusted Roofers in Temple TX like us can provide a safe, effective, and warrantied solution. We have the expertise to assess the situation accurately, recommend the best course of action, and execute repairs with precision.
The High Cost of Delay: Consequences of an Unrepaired Leak
Ignoring a “minor” roof leak is a costly mistake. It’s like ignoring a small crack in a dam—eventually, the whole thing can come tumbling down. The longer water intrudes, the more severe and expensive the damage becomes, potentially turning a simple Roof Repair into a full replacement.
From Drip to Disaster: How Damage Escalates
That innocent-looking drip can quickly turn into a cascade of problems. An untreated leak will saturate insulation, making it ineffective and leading to higher energy bills. It will rot wooden framing and roof decking, compromising your home’s structural integrity. This can lead to sagging ceilings, weakened walls, and even a partial roof collapse if left unchecked over time.
Consider the financial impact: the average cost to fix a roof leak is around $1,100, with most leaks costing between $360 and $1,550. However, if the leak progresses and requires extensive structural repairs or a full roof replacement, those costs can skyrocket to between $5,800 and $13,100. This is a significant jump that can often be avoided with prompt action. The water may travel 10 to 100 feet horizontally before dripping down, making the damage far more widespread than initially apparent.
Hidden Dangers: Mold and Electrical Hazards
Beyond structural damage, an unrepaired leak poses serious health and safety risks. Persistent moisture creates a perfect breeding ground for mold, which can develop within 24-48 hours. Mold can cause respiratory issues, allergic reactions, and other serious health problems. Before any mold remediation can be truly effective, you must repair a leaky roof to eliminate the moisture source. Friends may advise you to try cleaning up the mold first, but it will return with a vengeance if the leak persists. We’ve seen it happen countless times.
Furthermore, water dripping onto electrical wiring or light fixtures creates a serious fire hazard. Water and electricity are a dangerous combination, and a compromised electrical system due to a leak could lead to shorts, power outages, or even an electrical fire. Always turn off power to affected areas if water is near electrical components.
| Type of Roof Leak Repair | Average Cost (Range) | Potential Consequences of Delay |
|---|---|---|
| Minor Leak Repair | $360 – $1,550 | Mold growth, insulation damage, minor wood rot |
| Full Roof Replacement | $5,800 – $13,100 | Extensive structural damage, major mold, electrical fires, health issues |
Frequently Asked Questions about Finding a Roof Leak
We often get asked similar questions by concerned homeowners. Here are some of the most common inquiries about finding a roof leak:
What is the most likely place for a roof to leak?
The most likely places for a roof to leak are around any penetrations or breaks in the roof’s surface. This includes chimneys, plumbing vents, skylights, roof vents (especially where rubber boots crack), and areas where roof planes meet, such as valleys. Damaged or improperly installed flashing in these areas is the leading cause, accounting for approximately 90% of all roof leaks. These vulnerable points are where water has the easiest opportunity to bypass the roofing material and enter your home.
How can I find a leak in a roof without an attic?
If you don’t have attic access (for instance, if you have a vaulted ceiling or a flat roof), your investigation must start on the interior ceiling. Pinpoint the exact location of the water damage, including any stains or drips. Then, safely inspect the corresponding area on the roof’s exterior. Look for obvious signs of damage like missing or cracked shingles, compromised vent boots, or deteriorated flashing directly above and uphill from the interior stain. Because you can’t easily trace the water’s path from below, a water test with a hose, as described in Step 3 of our guide, is often necessary in these cases. You’ll need a patient spotter inside to confirm the leak location.
How long can you go without fixing a roof leak?
You should fix a roof leak immediately. There’s no safe amount of time to delay. Even a small leak can cause significant damage in a surprisingly short time. Water can lead to mold growth within 24-48 hours, and rapidly begin to compromise structural materials like wood and drywall. This leads to insulation becoming saturated and ineffective, and can quickly escalate a minor, inexpensive repair into a major, costly one. The longer you wait, the more extensive the damage will be, and the higher the repair bill.
Your Partner in Roof Protection
A leak is a clear sign that your roof needs attention. By following these investigative steps, you can identify the source and take action. For complex leaks, extensive damage, or if you simply want the peace of mind that comes with a professional assessment, don’t hesitate to seek expert help. EMC Remodeling is a family-operated business dedicated to providing quality craftsmanship roofing and reliable solutions across Temple, TX, and surrounding Central Texas communities. Our commitment to direct owner involvement and 24/7 emergency support means we’re always ready to assist. For a comprehensive inspection and expert roof repair services, contact our team today. We’re here to ensure your home remains safe, dry, and protected for years to come.