Siding Holes = Roof Risk: Fast Repairs and Emergency Actions
Answer first: A hole in your siding is an active water-entry point that can drive leaks into roof-to-wall joints during storms. Wind‑driven rain that bypasses cladding is a leading cause of interior water damage in severe weather. If a storm hit hard enough to puncture siding, schedule a same‑day roof inspection and, if needed, emergency tarping. For rapid response, contact a trusted roofing contractor in Temple—your local roofing company in Temple, TX.
Data you can act on: The EPA confirms mold can begin growing within 24–48 hours of moisture intrusion, making fast dry‑in critical. One inch of rain on a 2,000‑sq‑ft roof sheds roughly 1,246 gallons of water (USGS), and much of that can be forced behind damaged siding by wind. Texas also records some of the nation’s highest severe hail counts annually (NOAA SPC), so post‑storm inspections are not optional—they’re risk mitigation.
Quick links for emergencies: Book same‑day emergency roof repair and a follow‑up roof repair assessment; if replacement is warranted, our roof installation team can advise on options.
Quick Answer: How to Repair Holes in Siding
- Small holes (under 1/2 inch) – Fill with color-matched caulk from a siding supplier
- Medium holes (1/2 to 2 inches) – Use exterior filler, sand smooth, then prime and paint
- Large holes or cracks – Replace the entire damaged panel using a zip tool and new siding
 Initial hole formation, 2) Water penetration behind siding, 3) Moisture accumulation, 4) Mold growth and rot, 5) Structural damage and pest entry, with timeline showing damage can occur within months - siding hole repair infographic")
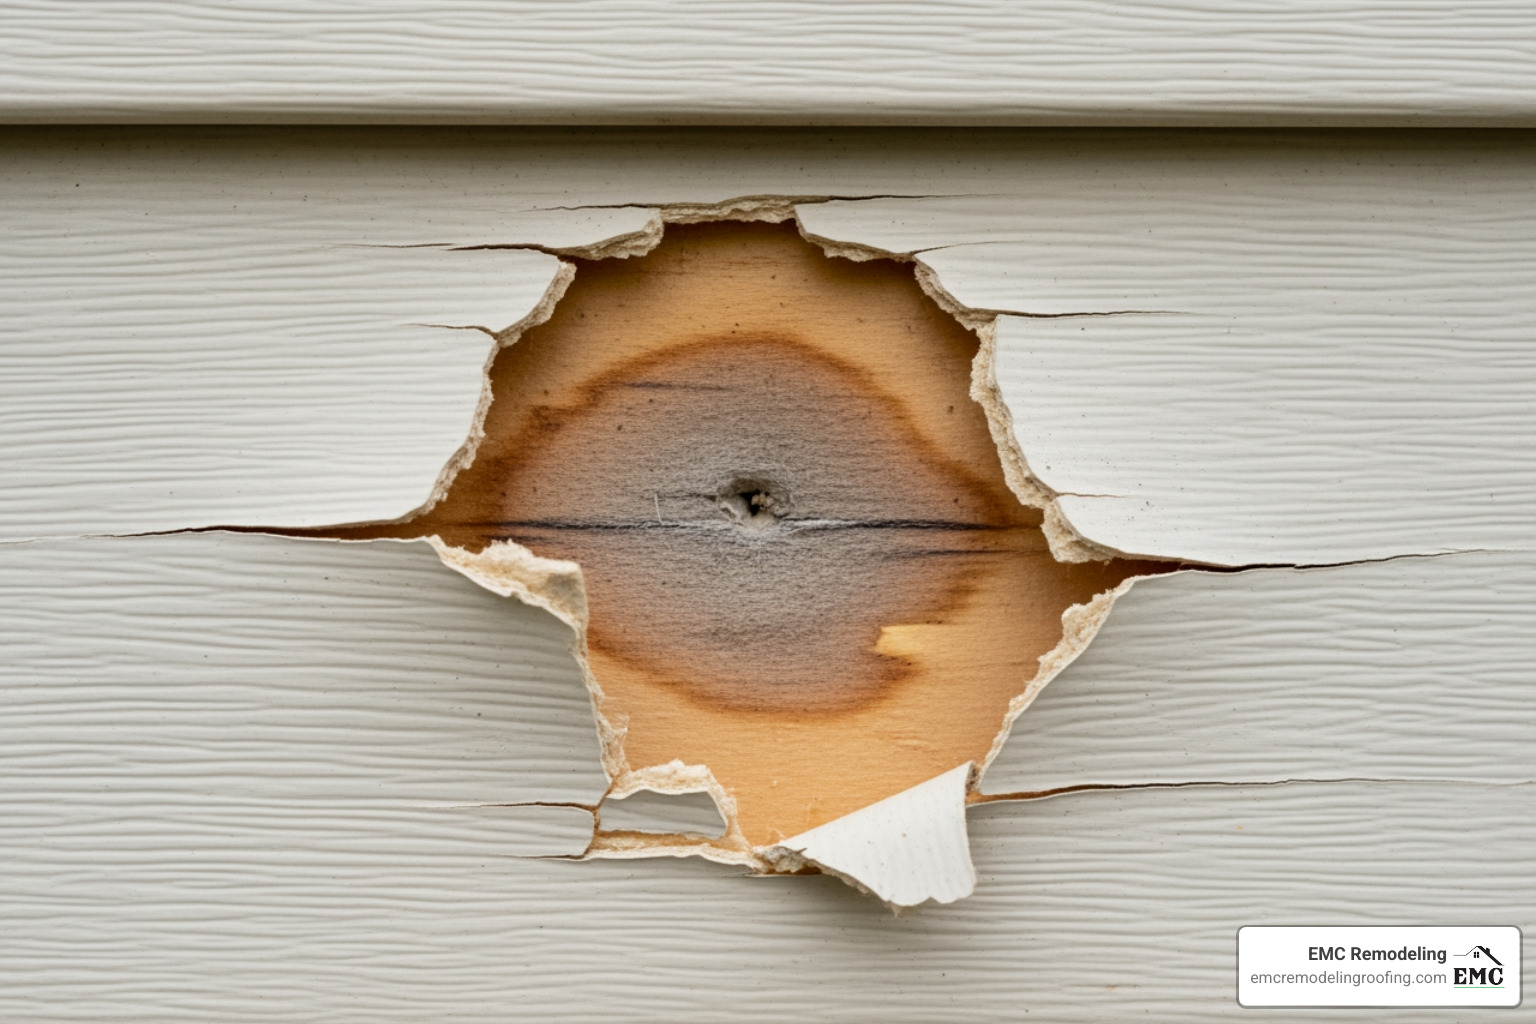
A small hole in your home’s siding is more than a cosmetic issue—it’s an open invitation for moisture, pests, and rot that can compromise your entire structure. When water sneaks behind your siding, it can cause extensive damage that’s far more expensive to fix than the original hole. For homeowners in Temple, TX, where hailstorms and high winds are common threats, timely exterior home repair is your first line of defense against costly future damage. After any storm, pair siding repairs with a roof evaluation and, if needed, rapid emergency roof repair to prevent active leaks.
The hidden dangers of unrepaired siding holes include:
- Water intrusion – Moisture seeps behind siding, soaking insulation and framing
- Structural damage – Rot weakens wall studs and sheathing over time
- Mold and mildew – Trapped moisture creates perfect conditions for harmful growth
- Pest infestation – Insects and rodents use holes as entry points to nest in walls
- Energy loss – Compromised insulation drives up heating and cooling costs
I’m Matthew Runyon, President of EMC Remodeling & Roofing in Temple, Texas. With over 15 years of hands-on experience in exterior home repair, I’ve seen how a small siding hole repair addressed today—and a fast roof check after storms—can prevent thousands of dollars in structural damage tomorrow.
 with bullet points for caulk method, tools needed, and 15-minute completion time; Medium holes (1/2 to 2 inches) showing filler application, sanding, and painting steps with 2-4 hour timeline; Large holes (over 2 inches) displaying panel replacement process with zip tool usage, material matching, and full-day project estimate - siding hole repair infographic")
Storm Damage Triage: Match Siding Type to Repair—and Inspect the Roof
Before starting a repair, identify the cause of the hole and your siding’s material. This determines the best repair method and helps prevent future damage. After any hail or wind event, pair siding fixes with a roof and flashing inspection; undetected shingle and ridge damage frequently co‑occur with wall impacts. If you see dents, granule loss, or lifted shingles, schedule roof repair and consider emergency roof repair if active leaking is present.
What’s Punching Holes in Your Siding?
Holes in siding don’t appear on their own. In Central Texas, hail damage and wind-blown debris from storms are the top culprits. One‑inch hail can fall at speeds that damage cladding and roofing components (NOAA NSSL). Wildlife also plays a role; woodpeckers hunt for insects in wood siding, and rodents may gnaw through materials to find shelter. Don’t overlook human causes like accidental impacts from yard work or sports, or small holes left behind from old utility lines.
Matching Your Siding to the Right Repair Strategy
Not all siding materials are repaired the same way, which is why professional siding services begin with material identification. If the storm also compromised roof edges, soffits, or gutters, integrate repairs and—when warranted—plan for roof installation to restore full-system performance.
Vinyl siding is affordable and forgiving. Small holes (under 1/2 inch) can be sealed with color-matched caulk. Medium damage (up to 2 inches) can be patched with exterior filler, but larger holes require panel replacement. Our vinyl siding specialists can guide you or handle the job.
Wood siding is beautiful but vulnerable to rot. Use an epoxy waterproof wood filler for small to medium holes, as it expands and contracts with the wood. For extensive rot or large holes, the damaged section must be cut out and replaced entirely.
Fiber cement siding, like James Hardie products, is tough but not indestructible. Use specialized cementitious fillers for small holes. Medium damage requires a patching compound, while large holes mean panel replacement. Always check the underlying weather barrier for damage.
Aluminum siding is difficult to patch invisibly. Color-matched caulk is the best option for small holes. Medium damage may take a patch with waterproof tape and sealant, but full panel replacement is often necessary for a clean look.
Composite siding repairs are not recommended. Holes and scratches compromise the panel’s integrity, making replacement the only reliable long-term solution.
Here’s a practical comparison of repair approaches based on hole size and material:
| Siding Material | Small Holes (under 1/2 inch) | Medium Holes (1/2 to 2 inches) | Large Holes (over 2 inches) |
|---|---|---|---|
| Vinyl | Color-matched caulk or exterior filler | Exterior filler with backer material, sand, prime, paint | Panel replacement using zip tool |
| Wood | Epoxy waterproof wood filler, sand, prime, paint | Epoxy wood filler, sand, prime, paint | Cut out damaged section, replace board, use stainless steel nails, prime, paint |
| Fiber Cement | Specialized repair kits or cementitious fillers, sand, paint | Patching compound, cure, sand, paint (check weather barrier) | Panel replacement, inspect weather barrier, install with corrosion-resistant fasteners |
| Aluminum | Color-matched caulk | Patch with waterproof tape, gutter sealant, paint | Full panel replacement |
| Composite | Full panel replacement recommended | Full panel replacement recommended | Full panel replacement (prime and paint all sides) |
Other materials have specific needs: Stone veneer uses matched stone putty for cracks, while stucco requires a layered patch. Steel siding can take epoxy filler for small holes, and OSB siding with water damage needs the compromised section cut out.
Ignoring any hole invites water infiltration that can lead to costly damage. This section helps you decide between a DIY fix and calling for professional siding hole repair expertise—and reminds you to book a roof assessment if the same storm struck your roof system.
The Right Kit, Plus Emergency Roof Dry‑In Essentials

For storm days, add a rapid dry‑in kit alongside your siding tools: 6‑mil poly or a roof tarp, 2×4 battens, cap nails, and exterior tape. Temporary roof‑to‑wall flashing with plastic and tape can stop interior damage within minutes. If you can’t safely access the roof, call our 24/7 emergency roof repair team for same‑day tarping.
Safety comes first, so start with the basics: safety glasses and work gloves are non-negotiable. If you’re sanding extensively or using power tools, add a dust mask or respirator to protect your lungs. For work above ground level, stability matters more than you might think. While ladders work for quick fixes, scaffolding provides a safer, more stable platform for larger repair areas, giving you room to move without constantly climbing up and down.
For the actual siding hole repair work, you’ll need a few basic hand tools. A putty knife is your go-to for applying fillers and scraping away loose debris—grab a plastic one if you’re working with vinyl to avoid scratching the surface. A utility knife handles trimming excess caulk, cutting patches, and scoring damaged sections. And a caulk gun makes applying sealants smooth and professional-looking rather than a messy struggle.
Surface preparation and finishing require sandpaper in various grits—100-grit for initial smoothing and 220-grit for final finishing touches. For the repair materials themselves, exterior filler like DAP Platinum Patch Advanced Exterior Filler works beautifully for medium-sized holes. If you’re repairing wood siding, make sure you choose an epoxy waterproof exterior wood filler that expands with the wood rather than shrinking over time.
Color-matched caulk deserves special attention because it’s the secret to invisible small hole repairs. Here’s the thing: your local home center probably won’t stock the exact shade you need. Siding wholesalers that supply contractors carry caulks specifically blended for dozens of different siding shades. Bring a small sample piece or a clear photo of your siding to ensure a perfect match—the difference between “close enough” and “exactly right” is obvious from just a few feet away.
For finishing touches, you’ll need primer and paint appropriate for your siding material. Zinsser Bulls Eye 1-2-3 Primer works well as a base coat, followed by exterior paint matched to your siding. A word of caution for vinyl: use paint specifically formulated for vinyl surfaces, and avoid dark colors on light siding, which can cause warping from heat absorption.
If you’re tackling larger holes, a backer material like a wood strip or scrap vinyl provides support behind the patch. Secure it with construction adhesive like DAP Dynagrip Heavy Duty MAX. For panel replacements, you’ll need siding nails appropriate to your material—stainless steel for wood, corrosion-resistant fasteners for fiber cement, and galvanized steel for composite. A zip tool (also called a siding removal tool) is absolutely essential for safely open uping and removing vinyl siding panels without damaging adjacent sections.
Having the right equipment for your siding services project ensures a professional-looking finish and transforms what could be a frustrating afternoon into a satisfying accomplishment. When you’re properly prepared, even first-time repairs can look like they were done by a pro. If the storm also compromised shingles or flashing, line up follow‑on roof repair to close the loop.
Step‑By‑Step: Seal the Siding, Safeguard the Roof
Now that you’re equipped, let’s cover the main siding hole repair techniques. Following these steps ensures a durable, weather-tight, and visually appealing result that protects your home—and reduces the chance of roof‑to‑wall leakage during the next storm.

The 15-Minute Fix: Small Hole Repair in Vinyl & Aluminum
For small punctures up to a half-inch in vinyl or aluminum, color-matched caulk is the easiest solution. It’s nearly invisible and keeps water out.
- Clean the area: Wipe the siding with a damp rag to remove dirt and debris. Let it dry completely to ensure a proper seal.
- Apply caulk: Squirt enough color-matched caulk into the hole to fill it completely, creating a solid water barrier.
- Smooth the bead: Use a finger or plastic putty knife to smooth the caulk flush with the siding before it starts to set.
- Trim excess: Once cured (check manufacturer instructions), use a razor blade to carefully trim any excess for a clean finish.
This simple siding hole repair is perfect for utility line holes or minor punctures.
Patching and Painting: A Guide to Medium Siding Hole Repair
For holes up to 2 inches, an exterior filler provides a strong, sandable, and paintable patch. This method works on various materials, including green hardie board siding, and creates a long-lasting repair.
For vinyl siding: Smooth any jagged edges and lightly sand the surrounding area with 220-grit sandpaper to help the filler adhere. Clean the area and let it dry. For holes over 1 inch, insert a backer material (scrap vinyl or wood) behind the hole, secured with construction adhesive. Apply an exterior filler like DAP Platinum Patch, slightly overfilling the hole. Work in thin layers for deeper holes. Smooth the patch with a wet plastic putty knife and let it dry (2-4 hours). Sand it level, starting with 100-grit and finishing with 220-grit sandpaper. Finally, prime and paint with a paint formulated for vinyl.
For wood siding: Scrape away loose paint and dig out any rotted wood until you reach healthy material. Sand the area, then apply an epoxy waterproof exterior wood filler, which expands and contracts with the wood. For woodpecker holes, Vinyl Concrete Patch is also an excellent, paintable option. Once dry, sand the patch level, then prime and paint or stain to match.
For fiber cement siding: Clean the area and apply a specialized fiber cement repair kit or cementitious filler according to the manufacturer’s instructions. Smooth, let cure, sand lightly, and paint to match.
When to Replace: Advanced Siding Hole Repair for Large Damage
If a panel has extensive cracking, multiple holes, or damage larger than a few inches, replacement is the only permanent solution. Replacing a vinyl panel is a manageable DIY project with the right tools.
- Access the panel: Use a zip tool to open up the bottom edge of the panel directly above the damaged one. Slide it along the length to expose the nailing fin of the panel you need to replace.
- Remove the damaged panel: Use a pry bar to remove the nails and detach the panel. Important: If the house wrap underneath is damaged, patch it with house wrap tape to maintain the moisture barrier.
- Prepare the new panel: Cut a new piece of vinyl siding to the exact size, matching the style. You may need to clip the nailing fin or bottom edge if it’s an end piece.
- Install the new panel: Fit the panel into the opening, ensuring it overlaps correctly. Drive siding nails into the studs, but leave them about 1/16 inch proud (away from the fin) to allow for expansion and contraction. Leave a 1/4-inch gap at stops and corners.
- Lock it in: Use the zip tool to snap the upper panel back into place over the new one.

Roof interface check (don’t skip): After the patch, inspect roof‑to‑wall flashing, step flashing, and soffit returns for lifted shingles, gaps, or sealant failure. If anything looks compromised—or if interior staining appears—book roof repair or immediate emergency roof repair.
For complex siding replacement needs after a storm or involving multiple panels, our team at EMC Remodeling is ready to help. Professional installation provides peace of mind.
Prevent Leaks Before They Start: Pro Tips and Emergency Triggers
An ounce of prevention is worth a pound of cure—especially when it comes to siding hole repair and roof protection. Severe weather in Central Texas turns small exterior penetrations into active leak points. Mold can begin within 24–48 hours of moisture exposure (EPA), so same‑day dry‑in is a must, not a maybe.
Authoritative guidance: The Insurance Institute for Business & Home Safety recommends prompt temporary cover and inspection after hail/wind to prevent secondary damage. If you cannot safely access the roof, request professional tarping immediately through emergency roof repair.
Keeping Your Siding Damage-Free
The best repair is the one you never have to make. A few proactive habits can dramatically reduce your chances of dealing with siding holes in the first place.
Regular inspections are your first line of defense. Make it a habit to walk the perimeter of your home, especially after severe weather rolls through. Look for new holes, cracks, or panels that seem loose or damaged. Catching small issues early prevents them from snowballing into expensive problems. Think of it as a health checkup for your home’s exterior.
Trim back that landscaping regularly. Those beautiful oak trees and overgrown shrubs might look great, but when their branches scrape against your siding or break off in a storm, they become projectiles aimed right at your home’s exterior. Keep branches at least a few feet away from your walls.
When it’s time to hang seasonal decorations or outdoor lights, skip the nails and screws. Use siding clips specifically designed for vinyl siding instead. These clever little devices hook onto the panels without puncturing them, leaving your siding intact when you take down those holiday lights.
Be mindful during yard work, too. We’ve all seen it happen—the lawn mower kicks up a rock, or the weed trimmer gets a little too close to the house. Those flying projectiles can punch holes faster than you’d think. Keep power equipment at a safe distance and consider the angle of debris discharge when working near your siding.
For wood siding homeowners, pest control isn’t just about comfort—it’s about protecting your investment. Boring bees and other wood-loving insects create entry points that attract woodpeckers, who then enlarge those holes searching for a meal. Treating wood with boric acid can deter these pests before they invite bigger problems.
When DIY Isn’t Enough: Calling for Professional Help
Here’s the line in the sand: if the storm that made the hole also produced roof leaks, water stains, or ceiling drips, request same‑day emergency roof repair for tarping and leak mitigation. If hail or wind stripped shingles, bent flashing, or opened ridge caps, schedule a full roof repair evaluation. For roof systems at end of life or with widespread impact damage, plan a consult with our roof installation team.
- After a significant hailstorm or windstorm, a professional storm damage assessment can catch hidden problems in the roof, sheathing, and weather barrier before they escalate. Pair this with a hail damage roof repair evaluation.
- Active water leakage demands immediate attention. Every hour of delay increases the risk of structural decay, mold growth, and insulation damage.
- Suspected rot or mold behind siding calls for professional remediation and selective replacement, not just surface patching.
Your Central Texas Team for Siding Repair—and 24/7 Roofing Emergencies
While many small siding hole repair tasks can be a rewarding weekend DIY project, there comes a point where calling in the professionals just makes sense—especially when storms also compromise the roof. We provide 24/7 emergency tarping and leak response, same‑week roof repair, and full-system roof installation when replacement is the prudent choice.
A professional assessment goes beyond just fixing what’s visible on the surface. When we inspect your siding, we’re looking for the hidden story behind that hole—checking the weather barrier, examining structural supports, and identifying any moisture damage that might be lurking out of sight. On the roof side, we document hail impacts, shingle displacement, flashing failures, and interior moisture paths so you have a single, unified scope of work.
For comprehensive and reliable siding repair in Temple, TX, and throughout Central Texas—including Lago Vista, Cedar Park, Leander, Georgetown, Killeen, Belton, Pflugerville, and Salado—the family-operated team at EMC Remodeling has your back. If you’re in Killeen, book a visit from a roofer near me in Killeen, TX.
Don’t let a small hole turn into a big problem that costs thousands to repair. Call us now at (254) 265-6479 for 24/7 emergency response and a free exterior inspection. We’ll give you an honest assessment, clear options, and a rapid plan to dry‑in, repair, and protect your home.
Sources for the data cited above: EPA (mold begins within 24–48 hours of moisture exposure), USGS Water Science School (1 inch of rainfall on 1,000 sq ft = 623 gallons), NOAA SPC/NSSL (hail and severe storm references).